In this article, we dive into the key differences between developing on Ethereum and Solana, guiding you through how to build on Solana. Coming from Ethereum, Solana will look and feel much different and have a diverse toolset to use as you develop. This article will arm you with all the tools necessary to build on Solana from an Ethereum background.
Account Model
When developing on Solana, the most significant difference will run into is the account model design. It is helpful to understand why Solana’s account model was designed differently. Unlike Ethereum, Solana is designed to take advantage of the multiple cores in high-end machines. There is a trend in computing resources where the amount of available cores increases over time and becomes cheaper for people to purchase. Considering this, the account model is designed to leverage multiple cores, creating a system that parallelizes the transactions with each other. This parallelization creates further optimizations, such as local fee markets and faster throughput, which we will explore later.
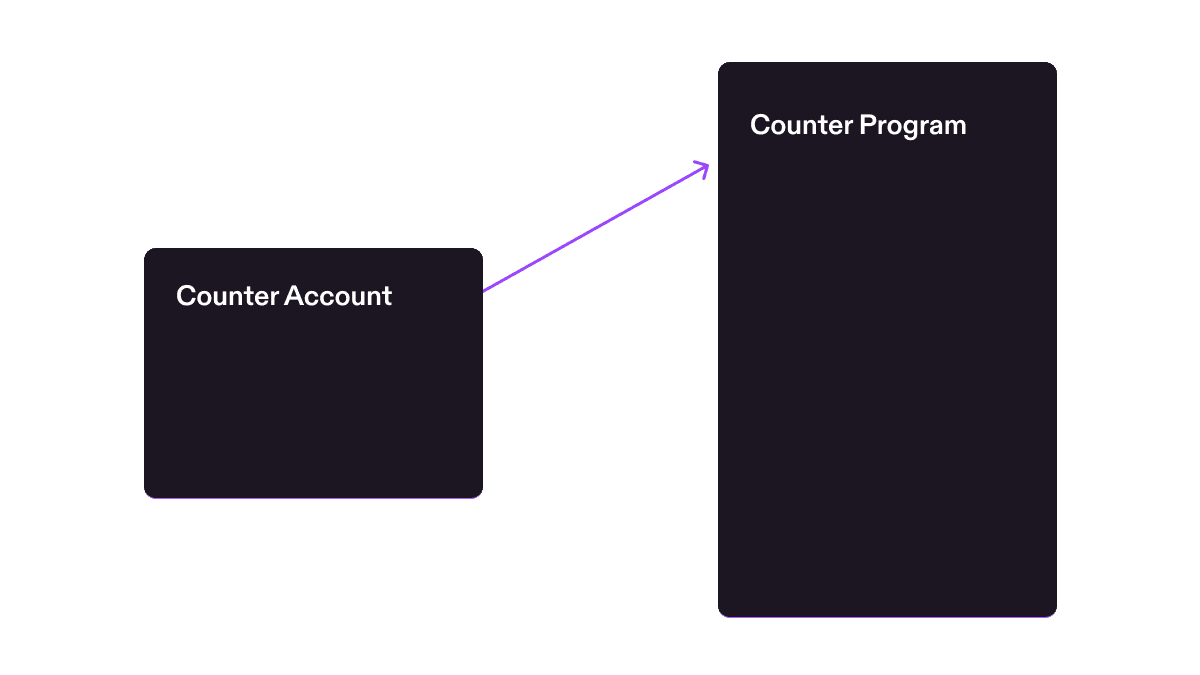
So what is meant by the “account model”? On Solana, accounts are like objects containing some arbitrary data and specific rules for modification. Everything is an account on Solana, including smart contracts. Like Ethereum, each account has an address identifier to help locate an account. However, unlike Ethereum, where each smart contract is an account with the execution logic and storage tied together, Solana’s smart contracts are entirely stateless.
Smart contracts on Solana carry no state of their own and must have the state passed to them to execute on. To illustrate this, let’s take a look at two smart contracts for a counter, one in Solidity on Ethereum and one using Rust on Solana.
Ethereum Counter Smart Contract
contract Counter {
  int private count = 0;
  function incrementCounter() public {
    count += 1;
  }
  function getCount() public constant returns (int) {
    return count;
  }
}
Solana Counter Program
#[program]
pub mod counter_anchor {
  use super::*;
  pub fn initialize_counter(_ctx: Context<InitializeCounter>) -> Result<()> {
    Ok(())
  }
  pub fn increment(ctx: Context<Increment>) -> Result<()> {
    ctx.accounts.counter.count = ctx.accounts.counter.count.checked_add(1).unwrap();
    Ok(())
  }
}

#[derive(Accounts)]
pub struct InitializeCounter<'info> {
  #[account(mut)]
  pub payer: Signer<'info>,
  #[account(
    init,
    space = 8 + Counter::INIT_SPACE,
    payer = payer
  )]
  pub counter: Account<'info, Counter>,
  pub system_program: Program<'info, System>,
}

#[derive(Accounts)]
pub struct Increment<'info> {
  #[account(mut)]
  pub counter: Account<'info, Counter>,
}

#[account]
#[derive(InitSpace)]
pub struct Counter {
  count: u64,
}
While in Solidity, you have int private count = 0;, you have a struct within the Rust smart contract stating initialize_counter. This initial counter creates an account with a count of 0, which you then can pass this account to increment to add to the count. This is not to have state within the smart contract itself.
There are separate accounts that store the data outside of the program. To execute the logic in a program, you would pass the account you want to perform on. In the case of this counter program, you pass a counter account to the program when calling the increment function, and the program will increment the value in the counter account.
What are the benefits of the Solana Account Model?
One of the most significant benefits of the Solana Account Model is program reusability.
Take ERC20 for example. ERC20 defines an interface specification on Ethereum for tokens. Every time someone wants to make a new token, the developer will have to redeploy the ERC20 smart contract onto Ethereum with its specified values, incurring the high cost of the redeployment.
Solana is different. You do not have to redeploy another smart contract onto the blockchain when creating new tokens. Instead, you create a new account, known as the mint account, off of the Solana Token Program, where the account defines a set of values to give the number of tokens in circulation, decimal points, who can mint more tokens, and who can freeze tokens.
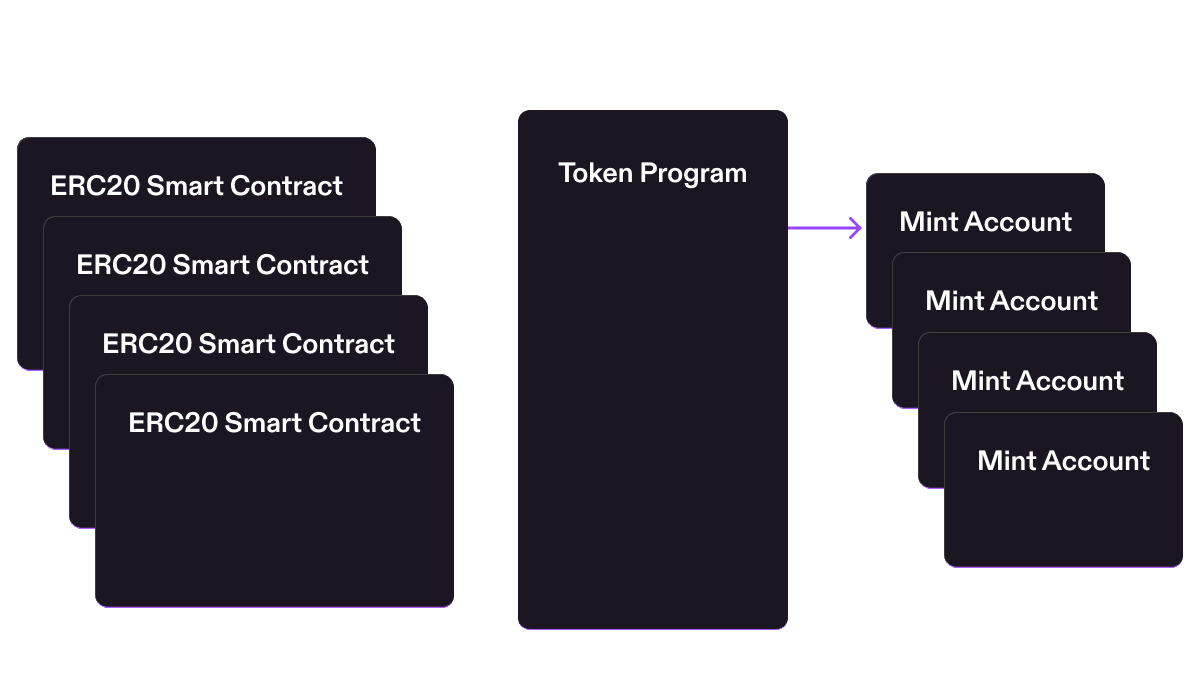
You do not need to write any Rust or smart contracts to deploy a new token on Solana. Send a transaction to the Token Program to create a new token in your language of choice, and the token will then appear in your wallet. With the Solana Program Library CLI, you can do this in a single command:
$ spl-token create-tokenLocal Fee Markets
Another fortunate side effect of having the Solana account model is the ability to model fees based on state contention. As mentioned earlier, transactions can be executed in parallel. However, they are only executed in parallel based on what accounts are being written to. For example, let's say there is a popular NFT mint going on Solana. Typically, this popularity would increase the prices for everyone using the chain, but instead, everyone not participating in the NFT mint is unaffected.
As the name suggests, fee markets are local per account. If you're sending a transfer of USDC to someone while everyone else is minting the hottest new NFT, you will be unaffected and continue paying the low fee you're used to on Solana. This works with any application in Solana, avoiding the common global fee market you're used to on Ethereum while lowering everyone's cost.
Solana에서 수수료는 어떻게 작동하나요?
Solana의 수수료는 기본 수수료(Base Fee), 우선순위 수수료(Priority Fee), rent의 몇 가지 범주로 나뉩니다.
기본 수수료는 트랜잭션의 서명 수를 기반으로 계산할 수 있습니다. 각 서명에는 5000 lamport(0.000000001 sol = 1 lamport)가 소요됩니다. 트랜잭션에 5개의 서명이 필요한 경우 기본 수수료는 25000 lamport가 됩니다. 이 기본 수수료는 클러스터의 서명 검증에 경제적 부하를 추가하는데, 이는 가장 컴퓨팅 집약적인 작업 중 하나입니다. 기본 수수료의 절반은 소각되고 나머지 절반은 validator에게 보상으로 지급됩니다.
우선순위 수수료는 동시에 실행되는 다른 트랜잭션보다 우선순위를 부여하기 위해 누구든 트랜잭션에 추가할 수 있는 선택적 수수료입니다. 우선순위 수수료는 트랜잭션에 사용된 컴퓨팅 유닛 수를 기반으로 측정됩니다. 컴퓨팅 유닛은 Ethereum의 Gas와 유사하게, 트랜잭션에 필요한 컴퓨팅 자원을 간단히 측정한 값입니다. Ethereum과 마찬가지로 트랜잭션의 우선순위는 컴퓨팅 유닛 가격과 사용된 컴퓨팅 유닛의 곱, 즉 우선순위 수수료 = 컴퓨팅 유닛 * 컴퓨팅 유닛 가격으로 계산됩니다. 기본 수수료와 마찬가지로 우선순위 수수료의 절반은 소각되고 나머지 절반은 validator에게 보상으로 지급됩니다.
마지막 수수료인 rent는 수수료라기보다는 보증금에 가깝습니다. 네트워크에서 계정을 생성하거나 공간을 할당할 때, 네트워크가 계정을 유지하기 위해 일정량의 SOL을 예치해야 합니다. rent는 네트워크에 저장된 바이트 수를 기반으로 계산되며, 공간 할당에 대한 추가 기본 수수료가 부과됩니다. 중요한 점은 rent 수수료가 소멸되지 않는다는 것입니다. 계정을 닫고 할당된 공간이 클러스터에 반환되면 회수할 수 있습니다.
Solana에서 트랜잭션은 어떻게 작동하나요?
트랜잭션을 실행할 때마다 수수료가 발생하므로, 트랜잭션이 어떻게 작동하는지 이해하는 것이 중요합니다. 트랜잭션은 세 가지 구성 요소로 이루어져 있습니다:
- 하나 이상의 명령어(instruction)
- 읽거나 쓸 계정 배열
- 하나 이상의 서명
- 최근 블록해시 또는 논스
명령어(instruction)는 Solana에서 가장 작은 실행 단위입니다. 명령어는 전역 Solana 상태를 업데이트하기 위한 호출입니다. 명령어는 Solana 런타임을 호출하여 상태를 업데이트하는 프로그램을 실행합니다(예: token program을 호출하여 내 계정에서 다른 계정으로 토큰을 전송). 명령어는 Ethereum 스마트 컨트랙트의 함수 호출과 유사하게 생각할 수 있습니다.
Ethereum과 Solana의 중요한 차이점 중 하나는 단일 트랜잭션 내에서 명령어 수에 따른 함수 호출 수입니다. 트랜잭션당 여러 명령어를 사용하면, 개발자가 단일 트랜잭션에서 함수를 연결하기 위한 커스텀 스마트 컨트랙트를 별도로 만들 필요가 없다는 장점이 있습니다. 각 명령어는 트랜잭션 내에서 순서대로 실행되는 별도의 함수 호출이 될 수 있습니다. 트랜잭션은 원자적(atomic)이므로, 명령어 중 하나라도 실패하면 전체 트랜잭션이 실패하며 트랜잭션 수수료만 지불하게 됩니다. 이는 Ethereum에서 슬리피지를 올바르게 설정하지 않아 트랜잭션이 실패하는 것과 유사합니다.
또 다른 중요한 차이점은 트랜잭션에 증분 논스 대신 최근 블록해시를 사용한다는 점입니다. 지갑이 트랜잭션을 생성하려면, 유효한 트랜잭션을 만들기 위해 클러스터에서 최근 블록해시를 가져옵니다. 이 최근 블록해시는 블록해시를 가져온 시점으로부터 150블록 동안만 트랜잭션을 유효하게 만듭니다. 이를 통해 오래된 트랜잭션 서명이 훨씬 나중에 실행되는 것을 방지합니다.
Cross-Program Invocation (CPI)
Cross-Program Invocation (CPI)는 원래 트랜잭션이 실행되는 동안 하나의 Solana 프로그램이 다른 프로그램의 명령어를 호출하는 것입니다. CPI는 Solana 프로그램들이 서로 상호작용하는 주요 방식이지만, 계정 모델로 인해 호출 그래프를 설계하는 방식이 달라집니다. 트랜잭션은 실행이 시작되기 전에 전체 CPI 체인에서 읽거나 쓸 모든 계정을 포함해야 합니다.
피호출자(callee)는 호출자(caller)가 받은 서명자 및 쓰기 권한만 상속받으며, 동일한 트랜잭션 컴퓨팅 예산을 공유합니다. 필요한 모든 서명자가 원래 트랜잭션에 서명한 경우 invoke를 사용하세요. 호출 프로그램이 서명자 시드(signer seeds)로 자신의 PDA 중 하나에 서명해야 하는 경우 invoke_signed를 사용하세요.
커밋 수준(Commitment levels)
RPC 읽기, 구독, 트랜잭션 확인 로직은 commitment 수준을 선택할 수 있습니다. 이는 Ethereum에서 몇 번의 블록 확인을 기다릴지 결정하는 것과 유사한 Solana 방식이지만, 단계가 명확하게 구분됩니다:
processed: 노드의 가장 최근 처리 상태입니다. 낙관적 UI 또는 롤백을 허용할 수 있는 흐름에서만 사용하세요.confirmed: 스테이크의 절대 다수가 투표한 블록입니다. 대부분의 프로덕션 확인 및 사용자 대상 트랜잭션 상태의 기본값으로 사용하세요.finalized: 가장 강력한 확인 상태입니다. 법정화폐 지급, 상품 배송, 최종 정산 기록 등 되돌릴 수 없는 오프체인 작업 이전에 사용하세요.
RPC 메서드가 commitment를 허용하는데 생략하면, 기본값은 일반적으로 finalized입니다. 프로덕션 클라이언트는 UI 지연 시간, 인덱서 동작 및 정산 정책이 의도적으로 설정되도록 commitment를 명시적으로 지정해야 합니다.
What are the limitations of transactions on Solana?
Like Ethereum gas limitations, there are specific compute unit limitations on transactions for Solana. Each limitation can be found below:
| Ethereum | Solana | |
| Single Transaction Compute Cap | 30,000,000 | 1,400,000 Compute Units |
| Block Compute Cap | 30,000,000 Gas | 48,000,000 Compute Units |
Solana는 트랜잭션에 몇 가지 추가 제한을 두고 있습니다. 참조된 각 계정은 블록당 최대 12,000,000 컴퓨팅 유닛을 사용할 수 있습니다. 이 제한은 단일 블록에서 하나의 계정에 쓰기 잠금이 너무 많이 발생하는 것을 방지하며, 로컬 수수료 시장이 단일 계정에 의해 독점되는 것을 추가로 방지합니다.
CPI 호출 체인도 의도적으로 얕게 유지됩니다. Solana는 현재 CPI 호출 깊이를 4로 제한하며, 명령어 스택에는 원래 명령어와 중첩된 CPI 프레임이 포함됩니다. 프로그램이 이 깊이를 초과하면, 런타임은 CallDepth 오류를 반환하고 트랜잭션이 실패합니다. 깊은 호출 그래프는 평탄화하거나 여러 트랜잭션으로 분할하세요.
재진입(Reentrancy)
Solana는 일반적인 A -> B -> A 공격에 대해 EVM 방식의 nonReentrant 가드가 필요하지 않습니다. 런타임은 ReentrancyNotAllowed로 간접 재진입을 차단하며, A -> A -> A와 같은 직접 재귀는 스택 깊이 및 컴퓨팅 제한 내에서만 허용됩니다. 실질적인 보안 관점의 변화는 "재진입을 무시하라"가 아니라, "공격자가 계정 목록과 프로그램에 전달하는 instruction data를 제어하므로, 계정과 CPI 대상을 신중하게 검증하라"는 것입니다.
Where is the Mempool?
Unlike Ethereum, Mempools don’t exist on Solana. Solana validators forward transactions to up to the following four leaders on the leader schedule. While Solana doesn’t have a mempool, it still has priority fees to help order transactions. Not having a mempool forces the transactions to hop from leader to leader until blockhash expiration, but it reduces the overhead of gossip communicating the mempool across the cluster.
Where can I find smart contract code?
In the EVM world, most are familiar with finding smart contract code on Etherscan when viewing the smart contract address. However, viewing smart contract code on an explorer in the Solana ecosystem is relatively new and needs to be established compared to EVM standards. At the time of writing, Solana.fm is the only explorer that supports viewing smart contract code based on verifiable builds.
You can find the smart contract code by visiting a smart contract address the explorer. For example, going to the Phoenix smart contract, you can find the smart contract’s code under the verification tab. From here, you can analyze the code and understand if the smart contract is something you want to interact with.
What are the differences in the developer environment?
Programming languages
EVM primarily uses Solidity to write smart contracts, while Solana uses Rust. There is a framework called the Anchor framework that allows you to build in Rust with many of the tools you are familiar with from EVM, but it is still Rust. If you want to stick with Solidity while building on Solana, a project named Neon enables using Solidity. Neon comes with many of the tools you are familiar with, such as using Foundry or Hardhat during development. Using Neon may get you up and running faster, building on Solana, but you would need more composability outside of the Neon ecosystem with other Solana projects.
Like Ethereum, on the client side, you can find comparable SDKs for all your favorite programming languages on Solana.
| Language | SDK |
| Javascript | solana/web3.js |
| Rust | solana_sdk |
| Python | solana-py |
| Java | solanaj |
| C++ | solcpp |
| C# | Solnet |
| GoLang | solana-go |
Where are the tools I’m familiar with from EVM?
As you migrate from EVM to building on Solana, you may be looking for the tools you are familiar with. Currently, the Solana ecosystem does not have tooling equal to Foundry but has a decent amount of other equivalents to the tools you are used to.
| Tool | Solana Equivalent |
| HardHat | Solana Test Validator |
| Brownie | Program-test, BankRun.js |
| Ethers, Wagmi | @solana/web.js |
| Remix | Solana Playground |
| ABI | Anchor Framework's IDL |
| Etherscan | SolanaFM, XRay |
| scaffold-eth | create-solana-dapp |
스마트 컨트랙트 개발에서 달라지는 점은 무엇인가요?
Solana에서 프로그램을 개발하거나 Ethereum 스마트 컨트랙트를 마이그레이션할 때 유의해야 할 사항이 여러 가지 있습니다.
EVM 개발자를 위한 보안 체크리스트
Solana 보안 검토는 EVM의 재진입 가드에서 명시적인 계정 및 CPI 검증으로 초점이 이동합니다. 마이그레이션된 프로그램을 배포하기 전에 다음을 확인하세요:
- 각 계정의 소유자, 주소 또는 PDA 시드, 판별자(discriminator), 데이터 길이, 그리고 명령어 내 다른 계정과의 관계를 검증하세요.
- 각 권한을 명시적인 서명자 또는 검증된 PDA로 요구하세요. 암묵적인
msg.sender는 존재하지 않습니다. - 명령어가 별도의 잔액, 볼트(vault), 또는 설정 계정을 기대하는 경우 중복된 변경 가능 계정을 거부하세요.
- CPI 대상을 예상되는 프로그램 ID에 고정하고, 공격자가 제공한 계정이 CPI 계정 목록에 대체될 수 없도록 하세요.
init_if_needed와 같은 헬퍼를 사용할 때 특히, 기존 계정이 재초기화되지 않도록 초기화 경로를 보호하세요.- lamport를 소진하고 상태를 폐쇄로 표시하여 계정을 닫아, 동일 트랜잭션 내에서 나중에 복구될 수 없도록 하세요.
- 검증된 수학 연산을 사용하고, 토큰 소수점, 민트 주소, 토큰 프로그램 변형이 원래 Solidity 가정과 일치하는지 확인하세요.
- 계정 대체, 서명자 스푸핑, 임의 CPI 프로그램 ID, 중복 쓰기 가능 계정, 재초기화, 계정 종료, CPI 이후 오래된 읽기를 테스트하세요.
예를 들어, Ethereum 스마트 컨트랙트에서 사용하던 매핑(mapping)과 같은 기능을 찾는다면, 이 방식은 Solana에서 직접적으로 존재하지 않습니다. 대신, Program Derived Address 또는 줄여서 PDA를 사용합니다. 매핑과 마찬가지로 Program Derived Address는 키 또는 계정에서 온체인에 저장된 값으로의 매핑을 생성할 수 있는 기능을 제공합니다. 매핑하는 방식은 Ethereum과 다릅니다.
사용자 계정을 온체인 잔액에 매핑하고 싶다고 가정해 보겠습니다. Solidity에서는 다음과 같이 작성합니다:
mapping(address => uint) public balances;With program derived addresses, you instead have to do the following:
Client:
const [BALANCE_PDA] = await anchor.web3.PublicKey.findProgramAddress(
  [Buffer.from("BALANCE"), pg.wallet.publicKey.toBuffer()],
  pg.program.programId
);
Program:
#[derive(Accounts)]
#[instruction(restaurant: String)]
pub struct BalanceAccounts<'info> {
    #[account(
        init_if_needed,
        payer = signer,
        space = 500,
        seeds = [balance.as_bytes().as_ref(), signer.key().as_ref()],
        bump
    )]
    pub balance: Account<'info, BalanceAccount>,
    #[account(mut)]
    pub signer: Signer<'info>,
    pub system_program: Program<'info, System>,
}

#[account]
pub struct BalanceAccount {
    pub balance: u8
}
The map's key is derived from the combination of the "balance" string and the signer's public key, while the program derived address provides the location to look up the map's value. Program derived addresses have more functionality than just providing a map; we can learn about that later.
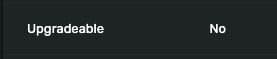
In Solidity, the ability to upgrade your smart contracts using proxy contracts has become the norm. On Solana, programs are default upgradable without any special work involved. Each smart contract can be upgraded by a CLI command solana program deploy <program_filepath. While programs are default upgradable, you can still demote their status to immutable with solana program set-upgrade-authority <program_address> --final. Once immutable, the program will be flagged as not upgradable on the explorers.
A common thing you do when writing a solidity smart contract is check for either msg.sender or tx.origin. There isn't an equivalent on Solana because each transaction can have multiple signers. Also the person sending the transaction is not necessarily the one who signed the transaction because you have someone else pay for your transactions.
Let’s take a look at this basic Solana Program:
#[program]
pub mod gettingSigners {
    use super::*;

    pub fn initialize(ctx: Context<Initialize>) -> Result<()> {
        let the_signer: &mut Signer = &mut ctx.accounts.the_signer;

        msg!("The signer: {:?}", *the_signer.key);

        Ok(())
    }
}

#[derive(Accounts)]
pub struct Initialize<'info> {
    #[account(mut)]
    pub the_signer: Signer<'info>,
}
This will output a signer of the transaction as part of your program logs. As mentioned before, you can have multiple signers:
#[program]
pub mod gettingSigners {
    use super::*;

    pub fn initialize(ctx: Context<Initialize>) -> Result<()> {
        let the_signer: &mut Signer = &mut ctx.accounts.first_signer;

        msg!("The signer: {:?}", *the_signer.key);

        Ok(())
    }
}

#[derive(Accounts)]
pub struct Initialize<'info> {
    #[account(mut)]
    pub first_signer: Signer<'info>,
    pub second_signer: Signer<'info>,
}
The above example shows that this specific program has multiple signers, first_signer and second_signer. We cannot necessarily tell which one is the payer, but we know both have signed the transaction. You can learn more about getting signers on Rareskills.
How do I build my EVM project on Solana?
Let’s take a simple project built in Solidity and go through the process of building the same project on Solana. A common first project you run into is a voting project. The Solidity smart contract would look like this:
pragma solidity ^0.6.4;

contract Voting {

    mapping (bytes32 => uint256) public votesReceived;

    bytes32[] public candidateList;

    constructor(bytes32[] memory candidateNames) public {
        candidateList = candidateNames;
    }

    function voteForCandidate(bytes32 candidate) public {
        require(validCandidate(candidate));
        votesReceived[candidate] += 1;
    }

    function totalVotesFor(bytes32 candidate) view public returns (uint256) {
        require(validCandidate(candidate));
        return votesReceived[candidate];
    }

    function validCandidate(bytes32 candidate) view public returns (bool) {
        for(uint i = 0; i < candidateList.length; i++) {
            if (candidateList[i] == candidate) {
                return true;
            }
        }
        return false;
    }
}
We quickly noticed a few things that were not available in Solana programs. View functions and mapping need to be done differently. Let’s start building this program on Solana!
Let’s create our very basic Solana program shell:
use anchor_lang::prelude::*;

declare_id!("6voY4gV7kzuGr4hE2xjZnkdagFGNhEe8WonZ8UtdPWig");

#[program]
pub mod voting {
    use super::*;

    pub fn init_candidate(ctx: Context<InitializeCandidate>) -> Result<()> {
        Ok(())
    }

    pub fn vote_for_candidate(ctx: Context<VoteCandidate>) -> Result<()> {
        Ok(())
    }
}

#[derive(Accounts)]
pub struct InitializeCandidate {}

#[derive(Accounts)]
pub struct VoteCandidate {}
We have two functions in our voting program, init_candidate and vote_for_candidate. The init_candidate function maps directly to our constructor in the Solidity smart contract, while vote_for_candidate maps one-to-one with voteForCandidate in Solidity.
One problem with init_candidate today is that it can be called by anyone permissionless, unlike the constructor in Solidity only being called by the contract deployer. To solve this, we will employ a similar feature to onlyOwner from Solidity. We set a specific address on the Solana program that is the only one that can execute the instruction.
Let’s say our publicKey is 8os8PKYmeVjU1mmwHZZNTEv5hpBXi5VvEKGzykduZAik. By adding a reference to this publicKey in the Solana program and requiring the signer to match, we effectively emulate both onlyOwner and the constructor.
use anchor_lang::prelude::*;

declare_id!("6voY4gV7kzuGr4hE2xjZnkdagFGNhEe8WonZ8UtdPWig");

const OWNER: &str = "8os8PKYmeVjU1mmwHZZNTEv5hpBXi5VvEKGzykduZAik";

#[program]
pub mod voting {
    use super::*;

    #[access_control(check(&ctx))]
    pub fn init_candidate(ctx: Context<InitializeCandidate>) -> Result<()> {
        Ok(())
    }

    pub fn vote_for_candidate(ctx: Context<VoteCandidate>) -> Result<()> {
        Ok(())
    }
}

#[derive(Accounts)]
pub struct InitializeCandidate<'info> {
    #[account(mut)]
    pub payer: Signer<'info>,
}

#[derive(Accounts)]
pub struct VoteCandidate {}

fn check(ctx: &Context<InitializeCandidate>) -> Result<()> {
    // Check if signer === owner
    require_keys_eq!(
        ctx.accounts.payer.key(),
        OWNER.parse::<Pubkey>().unwrap(),
        OnlyOwnerError::NotOwner
    );
    Ok(())
}

#[error_code]
pub enum OnlyOwnerError {
    #[msg("Only owner can call this function!")]
    NotOwner,
}
We added an access control function check that will check if the signer of init_candidate matches the address listed in the smart contract. If the signer does not match, the OnlyOwnerError will be thrown, and the transaction will fail.
Let’s move on to the next bit in the Solidity smart contract, candidateList and votesReceived. While you can use a Vec in a Solana program similar to bytes32[], managing the payments for changing the size can be a bit of a hassle. Instead, we will utilize Program Derived Addresses given specific candidate name, with the value found at that address being the votesReceived by the candidate.
To use Program Derived Accounts in a Solana Program, you use seeds and bump in the account. First, let’s create the account to track votesReceived.
#[account]
#[derive(InitSpace)]
pub struct Candidate {
    pub votes_received: u8,
}
#[account] denotes the struct as a Solana account, while the #[derive(InitSpace)] is a useful macro for auto-calculating the space required to allocate for Candidate. The votes_received can hold a count just like votesReceived in the Solidity smart contract.
Expanding the InitializeCandidate and VoteCandidate, we get the following:
#[derive(Accounts)]
#[instruction(_candidate_Name: String)]
pub struct InitializeCandidate<'info> {
    #[account(mut)]
    pub payer: Signer<'info>,

    #[account(
        init,
        space = 8 + Candidate::INIT_SPACE,
        payer = payer,
        seeds = [_candidate_Name.as_bytes().as_ref()],
        bump,
    )]
    pub candidate: Account<'info, Candidate>,
    pub system_program: Program<'info, System>,
}

#[derive(Accounts)]
#[instruction(_candidate_Name: String)]
pub struct VoteCandidate<'info> {
    #[account(
        mut,
        seeds = [_candidate_Name.as_bytes().as_ref()],
        bump,
    )]
    pub candidate: Account<'info, Candidate>,
}
Wow, that’s a lot of new code in the accounts. Let’s unpack it.
First you’ll notice #[instruction(_candidate_Name: String)]. This means the context for InitializeCandidate expects a string _candidate_name to be passed into the instruction. We can see later this is used in seeds = [_candidate_name.as_bytes().as_ref()]. This means that the seed of the PDA will be _candidate_Name, and the value stored at the PDA will be the candidate’s votes_received.
Next you may have some questions on space = 8 + Candidate::INIT_SPACE. The Candidate::INIT_SPACE is how big the Candidate account is + 8, 8 being the bytes added at the beginning of Anchor framework accounts for security checks. pub system_program: Program<'info, System>, is required when you’re creating an account, which is denoted by init. This means that any time an instruction using the InitializeCandidate context is called, the instruction will try to create a candidate account.
Now let’s add the business logic found in voteForCandidate from the Solidity smart contract.
pub fn vote_for_candidate(ctx: Context<VoteCandidate>, _candidate_name: String) -> Result<()> {
    ctx.accounts.candidate.votes_received += 1;
    Ok(())
}
Here we take an additional parameter discussed earlier, _candidate_name . This will help match to the exact account we’re referencing for the candidate. We then increment the votes by 1 for that candidate.
That’s all we need to complete on the Solana program side, with the final Solana program looking like this:
use anchor_lang::prelude::*;

declare_id!("6voY4gV7kzuGr4hE2xjZnkdagFGNhEe8WonZ8UtdPWig");

const OWNER: &str = "8os8PKYmeVjU1mmwHZZNTEv5hpBXi5VvEKGzykduZAik";

#[program]
pub mod voting {
    use super::*;

    #[access_control(check(&ctx))]
    pub fn init_candidate(ctx: Context<InitializeCandidate>, _candidate_name: String) -> Result<()> {
        Ok(())
    }

    pub fn vote_for_candidate(ctx: Context<VoteCandidate>, _candidate_name: String) -> Result<()> {
        ctx.accounts.candidate.votes_received += 1;
        Ok(())
    }
}

#[derive(Accounts)]
#[instruction(_candidate_name: String)]
pub struct InitializeCandidate<'info> {
    #[account(mut)]
    pub payer: Signer<'info>,

    #[account(
        init,
        space = 8 + Candidate::INIT_SPACE,
        payer = payer,
        seeds = [_candidate_name.as_bytes().as_ref()],
        bump,
    )]
    pub candidate: Account<'info, Candidate>,
    pub system_program: Program<'info, System>,
}

#[derive(Accounts)]
#[instruction(_candidate_name: String)]
pub struct VoteCandidate<'info> {
    #[account(
        mut,
        seeds = [_candidate_name.as_bytes().as_ref()],
        bump,
    )]
    pub candidate: Account<'info, Candidate>,
}

#[account]
#[derive(InitSpace)]
pub struct Candidate {
    pub votes_received: u8,
}

fn check(ctx: &Context<InitializeCandidate>) -> Result<()> {
    // Check if signer === owner
    require_keys_eq!(
        ctx.accounts.payer.key(),
        OWNER.parse::<Pubkey>().unwrap(),
        OnlyOwnerError::NotOwner
    );
    Ok(())
}

#[error_code]
pub enum OnlyOwnerError {
    #[msg("Only owner can call this function!")]
    NotOwner,
}
Now you might think, “But wait, what about totalVotesFor and validCandidate from the Solidity smart contract?” validCandidate is already accounted for because vote_for_candidate will fail if you pass an account that does not exist. totalVotesFor can be done client-side with Typescript and does not need to exist within the Solana program.
Now that we’ve built the Solana program, let’s interact with it.
Loading the program into Solana Playground, I can build and deploy it to Devnet. Once you build and deploy the program, you’ll find that you can run tests with the instructions on the test tab.
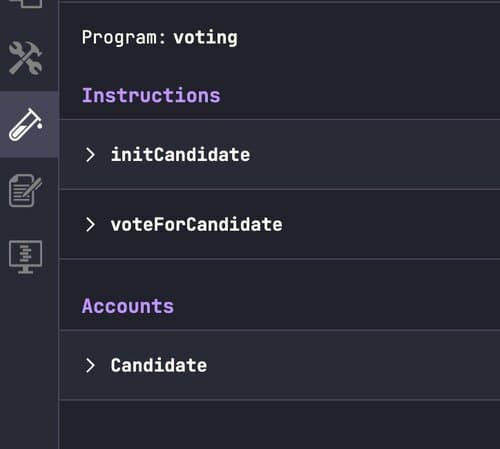
This is akin to using Remix to test your Solidity smart contract. Opening up initCandidate and entering the name John Smith as the candidate name, we now have to generate the PDA for John Smith. Click on the candidate account finder and select From seed. Select the custom String and input John Smith, and finally click generate. Congratulations, you just found your PDA for John Smith! Now hit Test to execute the instruction.
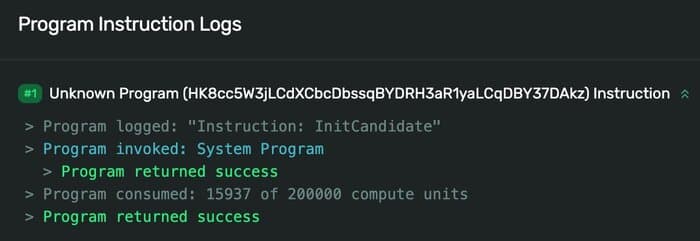
If all is successful, you should see the following program logs on the test transaction.
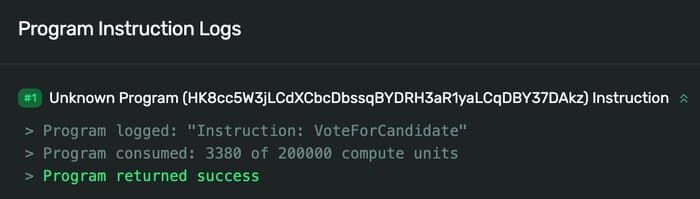
Now let’s vote for John Smith ! Opening up the
voteForCandidate instruction, type in John Smith and
generate the same PDA again. Hit Test to vote for your first
candidate!
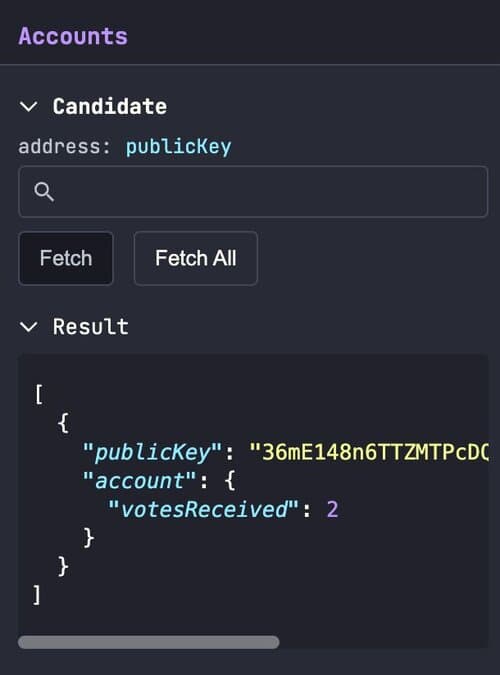
Now that you’ve voted, how can you check how many votes the candidate has?
Head on over to Candidate under Accounts on the test
tab and hit the button Fetch All. This will grab all valid
candidates and their votes. From there you’ll receive an array of the
candidates, their account addresses, and their votes.
Congratulations! You just took the voting Solidity smart contract and translated into a Solana program. You can use a lot of the same techniques on other Solidity smart contracts to build what you have on EVM on Solana. If you’re interested to learn more about Solana, check out the documentation and get started today.