In this article, we dive into the key differences between developing on Ethereum and Solana, guiding you through how to build on Solana. Coming from Ethereum, Solana will look and feel much different and have a diverse toolset to use as you develop. This article will arm you with all the tools necessary to build on Solana from an Ethereum background.
Account Model
When developing on Solana, the most significant difference will run into is the account model design. It is helpful to understand why Solana’s account model was designed differently. Unlike Ethereum, Solana is designed to take advantage of the multiple cores in high-end machines. There is a trend in computing resources where the amount of available cores increases over time and becomes cheaper for people to purchase. Considering this, the account model is designed to leverage multiple cores, creating a system that parallelizes the transactions with each other. This parallelization creates further optimizations, such as local fee markets and faster throughput, which we will explore later.
So what is meant by the “account model”? On Solana, accounts are like objects containing some arbitrary data and specific rules for modification. Everything is an account on Solana, including smart contracts. Like Ethereum, each account has an address identifier to help locate an account. However, unlike Ethereum, where each smart contract is an account with the execution logic and storage tied together, Solana’s smart contracts are entirely stateless.
Smart contracts on Solana carry no state of their own and must have the state passed to them to execute on. To illustrate this, let’s take a look at two smart contracts for a counter, one in Solidity on Ethereum and one using Rust on Solana.
Ethereum Counter Smart Contract
contract Counter {
  int private count = 0;
  function incrementCounter() public {
    count += 1;
  }
  function getCount() public constant returns (int) {
    return count;
  }
}
Solana Counter Program
#[program]
pub mod counter_anchor {
  use super::*;
  pub fn initialize_counter(_ctx: Context<InitializeCounter>) -> Result<()> {
    Ok(())
  }
  pub fn increment(ctx: Context<Increment>) -> Result<()> {
    ctx.accounts.counter.count = ctx.accounts.counter.count.checked_add(1).unwrap();
    Ok(())
  }
}

#[derive(Accounts)]
pub struct InitializeCounter<'info> {
  #[account(mut)]
  pub payer: Signer<'info>,
  #[account(
    init,
    space = 8 + Counter::INIT_SPACE,
    payer = payer
  )]
  pub counter: Account<'info, Counter>,
  pub system_program: Program<'info, System>,
}

#[derive(Accounts)]
pub struct Increment<'info> {
  #[account(mut)]
  pub counter: Account<'info, Counter>,
}

#[account]
#[derive(InitSpace)]
pub struct Counter {
  count: u64,
}
While in Solidity, you have int private count = 0;, you have a struct within the Rust smart contract stating initialize_counter. This initial counter creates an account with a count of 0, which you then can pass this account to increment to add to the count. This is not to have state within the smart contract itself.
There are separate accounts that store the data outside of the program. To execute the logic in a program, you would pass the account you want to perform on. In the case of this counter program, you pass a counter account to the program when calling the increment function, and the program will increment the value in the counter account.
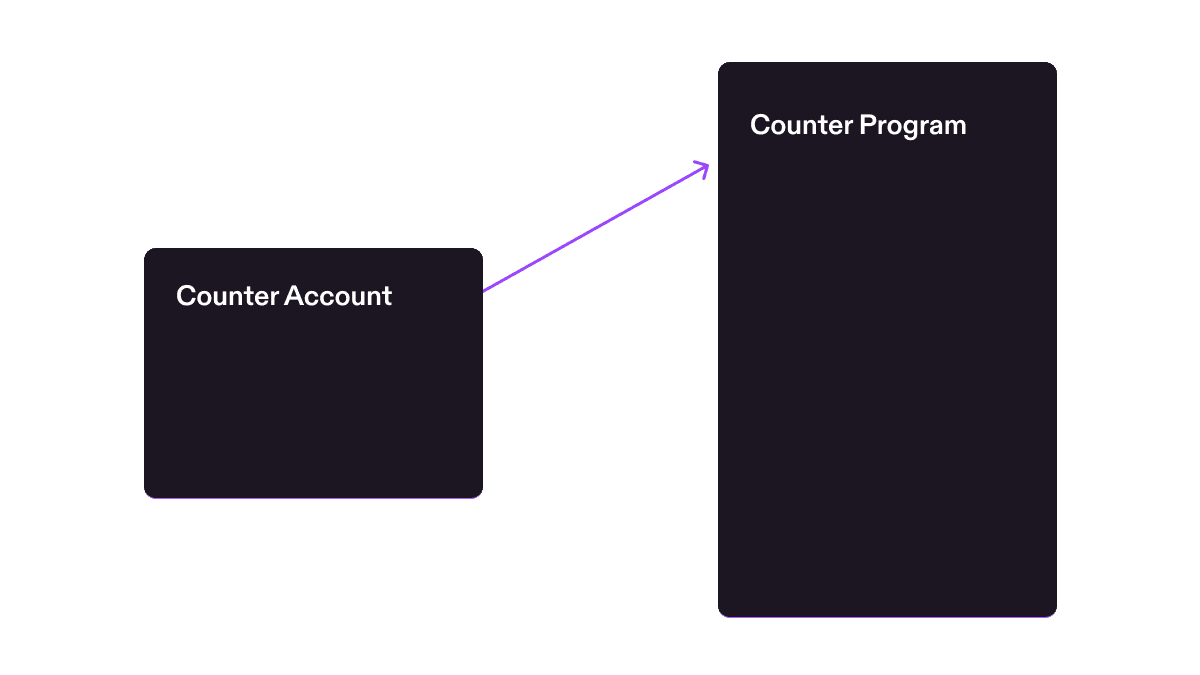
What are the benefits of the Solana Account Model?
One of the most significant benefits of the Solana Account Model is program reusability.
Take ERC20 for example. ERC20 defines an interface specification on Ethereum for tokens. Every time someone wants to make a new token, the developer will have to redeploy the ERC20 smart contract onto Ethereum with its specified values, incurring the high cost of the redeployment.
Solana is different. You do not have to redeploy another smart contract onto the blockchain when creating new tokens. Instead, you create a new account, known as the mint account, off of the Solana Token Program, where the account defines a set of values to give the number of tokens in circulation, decimal points, who can mint more tokens, and who can freeze tokens.
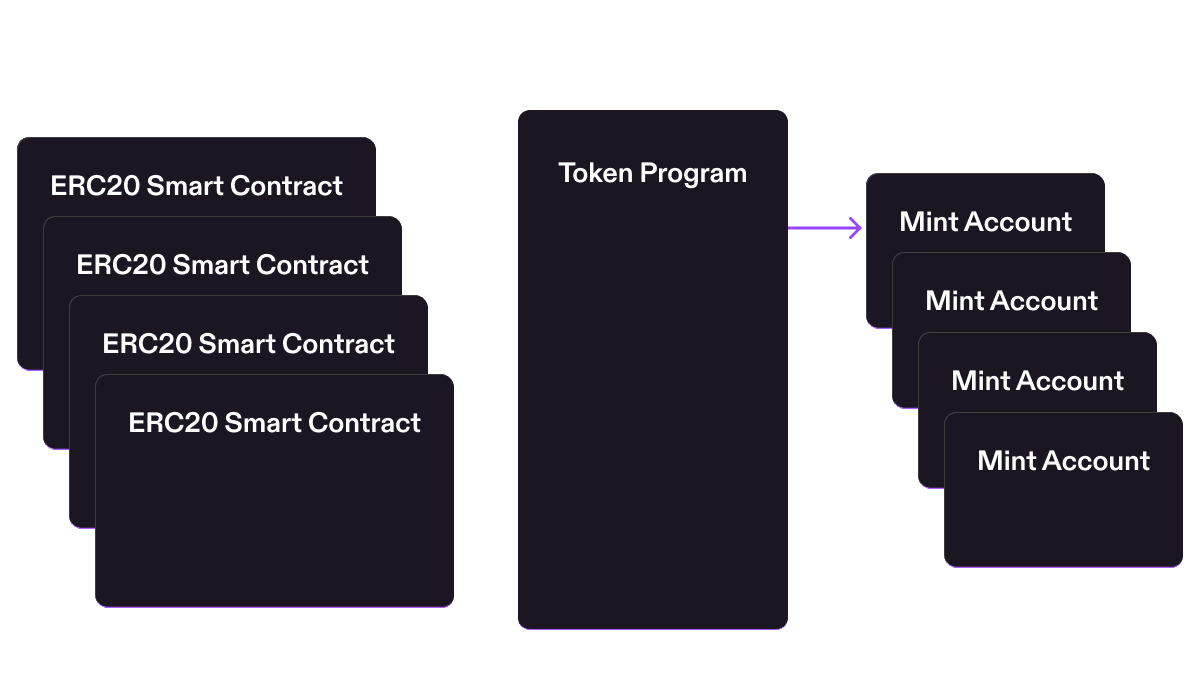
You do not need to write any Rust or smart contracts to deploy a new token on Solana. Send a transaction to the Token Program to create a new token in your language of choice, and the token will then appear in your wallet. With the Solana Program Library CLI, you can do this in a single command:
$ spl-token create-tokenLocal Fee Markets
Another fortunate side effect of having the Solana account model is the ability to model fees based on state contention. As mentioned earlier, transactions can be executed in parallel. However, they are only executed in parallel based on what accounts are being written to. For example, let's say there is a popular NFT mint going on Solana. Typically, this popularity would increase the prices for everyone using the chain, but instead, everyone not participating in the NFT mint is unaffected.
As the name suggests, fee markets are local per account. If you're sending a transfer of USDC to someone while everyone else is minting the hottest new NFT, you will be unaffected and continue paying the low fee you're used to on Solana. This works with any application in Solana, avoiding the common global fee market you're used to on Ethereum while lowering everyone's cost.
Solana 上的费用如何运作?
Solana 上的费用分为几个类别:基础费用、优先费用和 rent。
基础费用可根据交易中的签名数量计算。每个签名的费用为 5000 lamport(0.000000001 sol = 1 lamport)。如果您的交易需要 5 个签名,则基础费用为 25000 lamport。该基础费用为集群的签名验证增加了经济反压,而签名验证是计算密集型操作之一。基础费用的一半被销毁,另一半奖励给 validator。
优先费用是任何人都可以添加到交易中的可选费用,用于在同一时间执行的其他交易中获得优先权。优先费用根据交易中使用的计算单元数量来衡量。计算单元类似于以太坊上的 Gas,是衡量交易所需计算资源的简单指标。与以太坊类似,交易的优先级根据计算单元价格与所用计算单元数量的乘积计算,即 优先费用 = 计算单元 × 计算单元价格。与基础费用一样,优先费用的一半被销毁,另一半奖励给 validator。
最后一种费用 rent 更像是押金而非费用。当您在网络上创建账户或分配空间时,需要存入一定数量的 SOL,以便网络维护您的账户。rent 根据网络上存储的字节数计算,分配空间还需支付额外的基础费用。需要注意的是,rent 费用不会丢失;如果您关闭账户并允许集群回收已分配的空间,这些费用可以被收回。
Solana 上的交易是如何运作的?
由于执行每笔交易都需要支付费用,因此了解交易的运作方式非常重要。一笔交易由三个部分组成:
- 一条或多条指令
- 一个包含待读取或写入账户的数组
- 一个或多个签名
- 最近的区块哈希或 nonce
指令是 Solana 上最小的执行逻辑单元。指令用于调用并更新 Solana 的全局状态。指令会调用程序,而程序再调用 Solana 运行时来更新状态(例如,调用 Token Program 将代币从您的账户转移到另一个账户)。您可以将指令理解为对以太坊智能合约的函数调用。
以太坊与 Solana 之间的一个重要区别在于单笔交易中函数调用的数量,这取决于指令的数量。每笔交易支持多条指令,这对开发者非常有利,因为他们无需创建自定义智能合约来在单笔交易中串联函数。每条指令可以是一个独立的函数调用,在交易中按顺序执行。交易具有原子性,这意味着如果其中任何一条指令失败,整笔交易都将失败,您只需支付交易费用。这类似于在以太坊上因未设置正确滑点而导致交易失败的情况。
另一个需要记住的重要区别是:Solana 使用最近的区块哈希而非递增 nonce 来处理交易。当钱包想要发起一笔交易时,将从集群中获取最近的区块哈希以创建有效交易。该最近区块哈希仅在获取后的 150 个区块内使该交易有效,从而防止长期存活的交易签名在很久之后才被执行。
Cross-Program Invocation (CPI)
Cross-Program Invocation (CPI) 是指在原始交易执行期间,一个 Solana 程序调用另一个程序的指令。CPI 是 Solana 程序相互组合的主要方式,但账户模型改变了您设计调用图的方式:交易必须在执行开始前包含整个 CPI 调用链将读取或写入的每个账户。
被调用方仅继承调用方所获得的签名者和可写权限,且被调用方从同一笔交易的计算预算中扣费。当所有必要的签名者均已对原始交易签名时,使用 invoke。当调用程序需要使用签名者种子为其某个 Program Derived Address 签名时,使用 invoke_signed。
确认级别
RPC 读取、订阅和交易确认逻辑可选择 commitment 级别。这是 Solana 版本的"等待多少个以太坊区块确认",区别在于各级别是明确定义的:
processed:节点最新处理的视图。仅用于乐观 UI 或可容忍回滚的流程。confirmed:由超多数质押投票通过的区块。用作大多数生产确认和面向用户的交易状态的默认级别。finalized:最强的确认状态。在执行不可逆的链下操作之前使用,例如法币支付、货物发货或最终结算记录。
如果某个 RPC 方法支持 commitment 参数但您未设置,默认值通常为 finalized。生产客户端仍应明确设置 commitment,以便 UI 延迟、索引器行为和结算策略都是经过深思熟虑的。
What are the limitations of transactions on Solana?
Like Ethereum gas limitations, there are specific compute unit limitations on transactions for Solana. Each limitation can be found below:
| Ethereum | Solana | |
| Single Transaction Compute Cap | 30,000,000 | 1,400,000 Compute Units |
| Block Compute Cap | 30,000,000 Gas | 48,000,000 Compute Units |
Solana 对交易还设有若干额外上限。每个被引用的账户在单个区块中最多可使用 12,000,000 个计算单元。此上限防止某个账户在单个区块中被过多次地写锁定,从而避免局部费用市场被单一账户所占用。
CPI 调用链也被刻意限制为较浅的深度。Solana 目前将 CPI 调用深度限制为 4;指令栈包括原始指令加上嵌套的 CPI 帧。如果程序超过该深度,运行时将返回 CallDepth 错误,交易随之失败。请将深层调用图展平,或将流程拆分到多笔交易中。
重入
Solana 不需要 EVM 风格的 nonReentrant 守卫来防御常见的 A -> B -> A 攻击。运行时通过 ReentrancyNotAllowed 阻止间接重入,而直接自递归(如 A -> A -> A)仅在栈深度和计算限制内被允许。实际的安全转变并非"忽略重入",而是"仔细验证账户和 CPI 目标,因为攻击者可以控制传入您程序的账户列表和 instruction data。"
Where is the Mempool?
Unlike Ethereum, Mempools don’t exist on Solana. Solana validators forward transactions to up to the following four leaders on the leader schedule. While Solana doesn’t have a mempool, it still has priority fees to help order transactions. Not having a mempool forces the transactions to hop from leader to leader until blockhash expiration, but it reduces the overhead of gossip communicating the mempool across the cluster.
Where can I find smart contract code?
In the EVM world, most are familiar with finding smart contract code on Etherscan when viewing the smart contract address. However, viewing smart contract code on an explorer in the Solana ecosystem is relatively new and needs to be established compared to EVM standards. At the time of writing, Solana.fm is the only explorer that supports viewing smart contract code based on verifiable builds.
You can find the smart contract code by visiting a smart contract address the explorer. For example, going to the Phoenix smart contract, you can find the smart contract’s code under the verification tab. From here, you can analyze the code and understand if the smart contract is something you want to interact with.
What are the differences in the developer environment?
Programming languages
EVM primarily uses Solidity to write smart contracts, while Solana uses Rust. There is a framework called the Anchor framework that allows you to build in Rust with many of the tools you are familiar with from EVM, but it is still Rust. If you want to stick with Solidity while building on Solana, a project named Neon enables using Solidity. Neon comes with many of the tools you are familiar with, such as using Foundry or Hardhat during development. Using Neon may get you up and running faster, building on Solana, but you would need more composability outside of the Neon ecosystem with other Solana projects.
Like Ethereum, on the client side, you can find comparable SDKs for all your favorite programming languages on Solana.
| Language | SDK |
| Javascript | solana/web3.js |
| Rust | solana_sdk |
| Python | solana-py |
| Java | solanaj |
| C++ | solcpp |
| C# | Solnet |
| GoLang | solana-go |
Where are the tools I’m familiar with from EVM?
As you migrate from EVM to building on Solana, you may be looking for the tools you are familiar with. Currently, the Solana ecosystem does not have tooling equal to Foundry but has a decent amount of other equivalents to the tools you are used to.
| Tool | Solana Equivalent |
| HardHat | Solana Test Validator |
| Brownie | Program-test, BankRun.js |
| Ethers, Wagmi | @solana/web.js |
| Remix | Solana Playground |
| ABI | Anchor Framework's IDL |
| Etherscan | SolanaFM, XRay |
| scaffold-eth | create-solana-dapp |
智能合约开发有哪些不同之处?
在 Solana 上构建程序或将以太坊智能合约迁移过来时,有几点需要特别注意。
面向 EVM 开发者的安全检查清单
Solana 的安全审查重心从 EVM 的重入守卫转向了对账户和 CPI 的显式验证。在部署迁移后的程序之前,请检查以下事项:
- 验证每个账户的所有者、地址或 Program Derived Address 种子、鉴别器、数据长度,以及其与指令中其他账户的关系。
- 将每个授权方设为显式签名者或经过验证的 Program Derived Address。这里没有隐式的
msg.sender。 - 当指令预期使用独立的余额账户、资金库账户或配置账户时,拒绝重复的可变账户。
- 将 CPI 目标锁定到预期的程序 ID,并确保攻击者提供的账户无法被替换进 CPI 账户列表。
- 保护初始化路径,防止对已有账户进行重新初始化,尤其是在使用
init_if_needed等辅助工具时。 - 通过清空 lamport 余额并将状态标记为已关闭来关闭账户,防止其在同一笔交易的后续步骤中被复活。
- 使用经过检查的数学运算,并验证代币精度、铸币地址及 Token Program 变体是否与您原始的 Solidity 假设一致。
- 测试账户替换、签名者伪造、任意 CPI 程序 ID、重复可写账户、重新初始化、账户关闭以及 CPI 后的过期读取。
例如,如果您想使用类似以太坊智能合约中 mapping 的功能,这种类型在 Solana 上并不直接存在。您需要使用程序派生地址,即 PDA。与 mapping 类似,Program Derived Address 能够让您创建从某个键或账户到链上存储值的映射关系,但其映射方式与以太坊不同。
假设您想将用户账户与其链上余额进行映射。在 Solidity 中,您会这样写:
mapping(address => uint) public balances;With program derived addresses, you instead have to do the following:
Client:
const [BALANCE_PDA] = await anchor.web3.PublicKey.findProgramAddress(
  [Buffer.from("BALANCE"), pg.wallet.publicKey.toBuffer()],
  pg.program.programId
);
Program:
#[derive(Accounts)]
#[instruction(restaurant: String)]
pub struct BalanceAccounts<'info> {
    #[account(
        init_if_needed,
        payer = signer,
        space = 500,
        seeds = [balance.as_bytes().as_ref(), signer.key().as_ref()],
        bump
    )]
    pub balance: Account<'info, BalanceAccount>,
    #[account(mut)]
    pub signer: Signer<'info>,
    pub system_program: Program<'info, System>,
}

#[account]
pub struct BalanceAccount {
    pub balance: u8
}
The map's key is derived from the combination of the "balance" string and the signer's public key, while the program derived address provides the location to look up the map's value. Program derived addresses have more functionality than just providing a map; we can learn about that later.
In Solidity, the ability to upgrade your smart contracts using proxy contracts has become the norm. On Solana, programs are default upgradable without any special work involved. Each smart contract can be upgraded by a CLI command solana program deploy <program_filepath. While programs are default upgradable, you can still demote their status to immutable with solana program set-upgrade-authority <program_address> --final. Once immutable, the program will be flagged as not upgradable on the explorers.
A common thing you do when writing a solidity smart contract is check for either msg.sender or tx.origin. There isn't an equivalent on Solana because each transaction can have multiple signers. Also the person sending the transaction is not necessarily the one who signed the transaction because you have someone else pay for your transactions.
Let’s take a look at this basic Solana Program:
#[program]
pub mod gettingSigners {
    use super::*;

    pub fn initialize(ctx: Context<Initialize>) -> Result<()> {
        let the_signer: &mut Signer = &mut ctx.accounts.the_signer;

        msg!("The signer: {:?}", *the_signer.key);

        Ok(())
    }
}

#[derive(Accounts)]
pub struct Initialize<'info> {
    #[account(mut)]
    pub the_signer: Signer<'info>,
}
This will output a signer of the transaction as part of your program logs. As mentioned before, you can have multiple signers:
#[program]
pub mod gettingSigners {
    use super::*;

    pub fn initialize(ctx: Context<Initialize>) -> Result<()> {
        let the_signer: &mut Signer = &mut ctx.accounts.first_signer;

        msg!("The signer: {:?}", *the_signer.key);

        Ok(())
    }
}

#[derive(Accounts)]
pub struct Initialize<'info> {
    #[account(mut)]
    pub first_signer: Signer<'info>,
    pub second_signer: Signer<'info>,
}
The above example shows that this specific program has multiple signers, first_signer and second_signer. We cannot necessarily tell which one is the payer, but we know both have signed the transaction. You can learn more about getting signers on Rareskills.
How do I build my EVM project on Solana?
Let’s take a simple project built in Solidity and go through the process of building the same project on Solana. A common first project you run into is a voting project. The Solidity smart contract would look like this:
pragma solidity ^0.6.4;

contract Voting {

    mapping (bytes32 => uint256) public votesReceived;

    bytes32[] public candidateList;

    constructor(bytes32[] memory candidateNames) public {
        candidateList = candidateNames;
    }

    function voteForCandidate(bytes32 candidate) public {
        require(validCandidate(candidate));
        votesReceived[candidate] += 1;
    }

    function totalVotesFor(bytes32 candidate) view public returns (uint256) {
        require(validCandidate(candidate));
        return votesReceived[candidate];
    }

    function validCandidate(bytes32 candidate) view public returns (bool) {
        for(uint i = 0; i < candidateList.length; i++) {
            if (candidateList[i] == candidate) {
                return true;
            }
        }
        return false;
    }
}
We quickly noticed a few things that were not available in Solana programs. View functions and mapping need to be done differently. Let’s start building this program on Solana!
Let’s create our very basic Solana program shell:
use anchor_lang::prelude::*;

declare_id!("6voY4gV7kzuGr4hE2xjZnkdagFGNhEe8WonZ8UtdPWig");

#[program]
pub mod voting {
    use super::*;

    pub fn init_candidate(ctx: Context<InitializeCandidate>) -> Result<()> {
        Ok(())
    }

    pub fn vote_for_candidate(ctx: Context<VoteCandidate>) -> Result<()> {
        Ok(())
    }
}

#[derive(Accounts)]
pub struct InitializeCandidate {}

#[derive(Accounts)]
pub struct VoteCandidate {}
We have two functions in our voting program, init_candidate and vote_for_candidate. The init_candidate function maps directly to our constructor in the Solidity smart contract, while vote_for_candidate maps one-to-one with voteForCandidate in Solidity.
One problem with init_candidate today is that it can be called by anyone permissionless, unlike the constructor in Solidity only being called by the contract deployer. To solve this, we will employ a similar feature to onlyOwner from Solidity. We set a specific address on the Solana program that is the only one that can execute the instruction.
Let’s say our publicKey is 8os8PKYmeVjU1mmwHZZNTEv5hpBXi5VvEKGzykduZAik. By adding a reference to this publicKey in the Solana program and requiring the signer to match, we effectively emulate both onlyOwner and the constructor.
use anchor_lang::prelude::*;

declare_id!("6voY4gV7kzuGr4hE2xjZnkdagFGNhEe8WonZ8UtdPWig");

const OWNER: &str = "8os8PKYmeVjU1mmwHZZNTEv5hpBXi5VvEKGzykduZAik";

#[program]
pub mod voting {
    use super::*;

    #[access_control(check(&ctx))]
    pub fn init_candidate(ctx: Context<InitializeCandidate>) -> Result<()> {
        Ok(())
    }

    pub fn vote_for_candidate(ctx: Context<VoteCandidate>) -> Result<()> {
        Ok(())
    }
}

#[derive(Accounts)]
pub struct InitializeCandidate<'info> {
    #[account(mut)]
    pub payer: Signer<'info>,
}

#[derive(Accounts)]
pub struct VoteCandidate {}

fn check(ctx: &Context<InitializeCandidate>) -> Result<()> {
    // Check if signer === owner
    require_keys_eq!(
        ctx.accounts.payer.key(),
        OWNER.parse::<Pubkey>().unwrap(),
        OnlyOwnerError::NotOwner
    );
    Ok(())
}

#[error_code]
pub enum OnlyOwnerError {
    #[msg("Only owner can call this function!")]
    NotOwner,
}
We added an access control function check that will check if the signer of init_candidate matches the address listed in the smart contract. If the signer does not match, the OnlyOwnerError will be thrown, and the transaction will fail.
Let’s move on to the next bit in the Solidity smart contract, candidateList and votesReceived. While you can use a Vec in a Solana program similar to bytes32[], managing the payments for changing the size can be a bit of a hassle. Instead, we will utilize Program Derived Addresses given specific candidate name, with the value found at that address being the votesReceived by the candidate.
To use Program Derived Accounts in a Solana Program, you use seeds and bump in the account. First, let’s create the account to track votesReceived.
#[account]
#[derive(InitSpace)]
pub struct Candidate {
    pub votes_received: u8,
}
#[account] denotes the struct as a Solana account, while the #[derive(InitSpace)] is a useful macro for auto-calculating the space required to allocate for Candidate. The votes_received can hold a count just like votesReceived in the Solidity smart contract.
Expanding the InitializeCandidate and VoteCandidate, we get the following:
#[derive(Accounts)]
#[instruction(_candidate_Name: String)]
pub struct InitializeCandidate<'info> {
    #[account(mut)]
    pub payer: Signer<'info>,

    #[account(
        init,
        space = 8 + Candidate::INIT_SPACE,
        payer = payer,
        seeds = [_candidate_Name.as_bytes().as_ref()],
        bump,
    )]
    pub candidate: Account<'info, Candidate>,
    pub system_program: Program<'info, System>,
}

#[derive(Accounts)]
#[instruction(_candidate_Name: String)]
pub struct VoteCandidate<'info> {
    #[account(
        mut,
        seeds = [_candidate_Name.as_bytes().as_ref()],
        bump,
    )]
    pub candidate: Account<'info, Candidate>,
}
Wow, that’s a lot of new code in the accounts. Let’s unpack it.
First you’ll notice #[instruction(_candidate_Name: String)]. This means the context for InitializeCandidate expects a string _candidate_name to be passed into the instruction. We can see later this is used in seeds = [_candidate_name.as_bytes().as_ref()]. This means that the seed of the PDA will be _candidate_Name, and the value stored at the PDA will be the candidate’s votes_received.
Next you may have some questions on space = 8 + Candidate::INIT_SPACE. The Candidate::INIT_SPACE is how big the Candidate account is + 8, 8 being the bytes added at the beginning of Anchor framework accounts for security checks. pub system_program: Program<'info, System>, is required when you’re creating an account, which is denoted by init. This means that any time an instruction using the InitializeCandidate context is called, the instruction will try to create a candidate account.
Now let’s add the business logic found in voteForCandidate from the Solidity smart contract.
pub fn vote_for_candidate(ctx: Context<VoteCandidate>, _candidate_name: String) -> Result<()> {
    ctx.accounts.candidate.votes_received += 1;
    Ok(())
}
Here we take an additional parameter discussed earlier, _candidate_name . This will help match to the exact account we’re referencing for the candidate. We then increment the votes by 1 for that candidate.
That’s all we need to complete on the Solana program side, with the final Solana program looking like this:
use anchor_lang::prelude::*;

declare_id!("6voY4gV7kzuGr4hE2xjZnkdagFGNhEe8WonZ8UtdPWig");

const OWNER: &str = "8os8PKYmeVjU1mmwHZZNTEv5hpBXi5VvEKGzykduZAik";

#[program]
pub mod voting {
    use super::*;

    #[access_control(check(&ctx))]
    pub fn init_candidate(ctx: Context<InitializeCandidate>, _candidate_name: String) -> Result<()> {
        Ok(())
    }

    pub fn vote_for_candidate(ctx: Context<VoteCandidate>, _candidate_name: String) -> Result<()> {
        ctx.accounts.candidate.votes_received += 1;
        Ok(())
    }
}

#[derive(Accounts)]
#[instruction(_candidate_name: String)]
pub struct InitializeCandidate<'info> {
    #[account(mut)]
    pub payer: Signer<'info>,

    #[account(
        init,
        space = 8 + Candidate::INIT_SPACE,
        payer = payer,
        seeds = [_candidate_name.as_bytes().as_ref()],
        bump,
    )]
    pub candidate: Account<'info, Candidate>,
    pub system_program: Program<'info, System>,
}

#[derive(Accounts)]
#[instruction(_candidate_name: String)]
pub struct VoteCandidate<'info> {
    #[account(
        mut,
        seeds = [_candidate_name.as_bytes().as_ref()],
        bump,
    )]
    pub candidate: Account<'info, Candidate>,
}

#[account]
#[derive(InitSpace)]
pub struct Candidate {
    pub votes_received: u8,
}

fn check(ctx: &Context<InitializeCandidate>) -> Result<()> {
    // Check if signer === owner
    require_keys_eq!(
        ctx.accounts.payer.key(),
        OWNER.parse::<Pubkey>().unwrap(),
        OnlyOwnerError::NotOwner
    );
    Ok(())
}

#[error_code]
pub enum OnlyOwnerError {
    #[msg("Only owner can call this function!")]
    NotOwner,
}
Now you might think, “But wait, what about totalVotesFor and validCandidate from the Solidity smart contract?” validCandidate is already accounted for because vote_for_candidate will fail if you pass an account that does not exist. totalVotesFor can be done client-side with Typescript and does not need to exist within the Solana program.
Now that we’ve built the Solana program, let’s interact with it.
Loading the program into Solana Playground, I can build and deploy it to Devnet. Once you build and deploy the program, you’ll find that you can run tests with the instructions on the test tab.
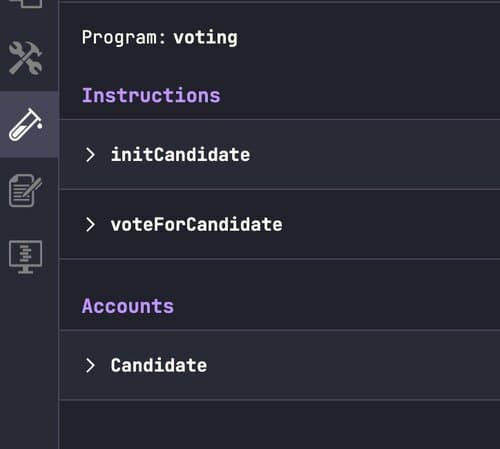
This is akin to using Remix to test your Solidity smart contract. Opening up initCandidate and entering the name John Smith as the candidate name, we now have to generate the PDA for John Smith. Click on the candidate account finder and select From seed. Select the custom String and input John Smith, and finally click generate. Congratulations, you just found your PDA for John Smith! Now hit Test to execute the instruction.
If all is successful, you should see the following program logs on the test transaction.
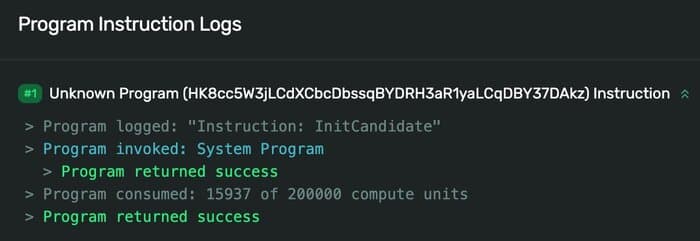
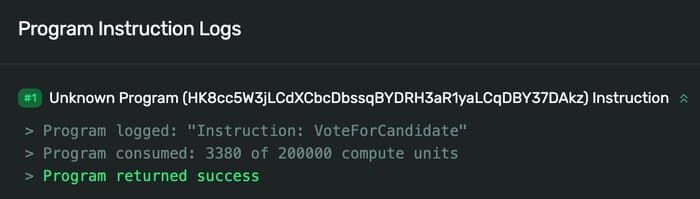
Now let’s vote for John Smith ! Opening up the
voteForCandidate instruction, type in John Smith and
generate the same PDA again. Hit Test to vote for your first
candidate!
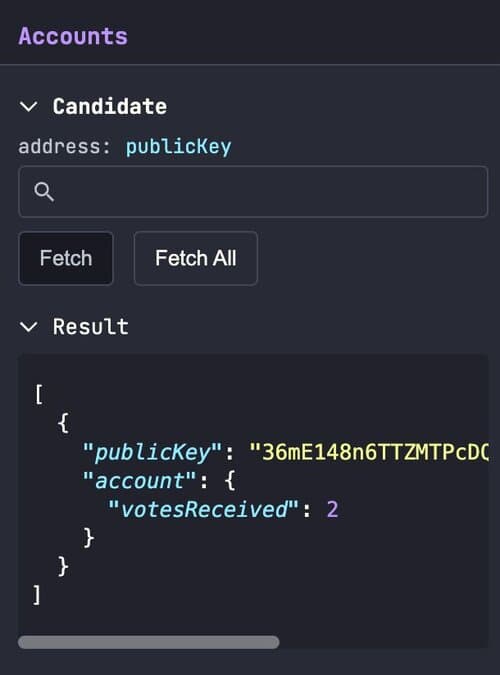
Now that you’ve voted, how can you check how many votes the candidate has?
Head on over to Candidate under Accounts on the test
tab and hit the button Fetch All. This will grab all valid
candidates and their votes. From there you’ll receive an array of the
candidates, their account addresses, and their votes.
Congratulations! You just took the voting Solidity smart contract and translated into a Solana program. You can use a lot of the same techniques on other Solidity smart contracts to build what you have on EVM on Solana. If you’re interested to learn more about Solana, check out the documentation and get started today.