In this article, we dive into the key differences between developing on Ethereum and Solana, guiding you through how to build on Solana. Coming from Ethereum, Solana will look and feel much different and have a diverse toolset to use as you develop. This article will arm you with all the tools necessary to build on Solana from an Ethereum background.
Account Model
When developing on Solana, the most significant difference will run into is the account model design. It is helpful to understand why Solana’s account model was designed differently. Unlike Ethereum, Solana is designed to take advantage of the multiple cores in high-end machines. There is a trend in computing resources where the amount of available cores increases over time and becomes cheaper for people to purchase. Considering this, the account model is designed to leverage multiple cores, creating a system that parallelizes the transactions with each other. This parallelization creates further optimizations, such as local fee markets and faster throughput, which we will explore later.
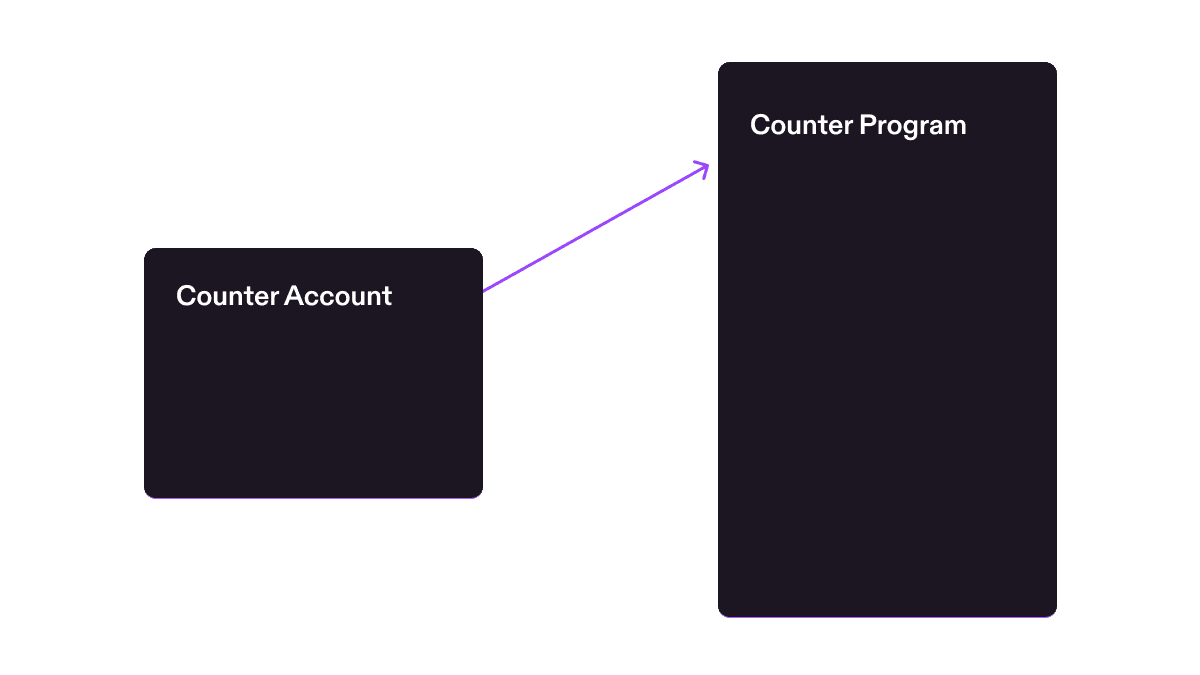
So what is meant by the “account model”? On Solana, accounts are like objects containing some arbitrary data and specific rules for modification. Everything is an account on Solana, including smart contracts. Like Ethereum, each account has an address identifier to help locate an account. However, unlike Ethereum, where each smart contract is an account with the execution logic and storage tied together, Solana’s smart contracts are entirely stateless.
Smart contracts on Solana carry no state of their own and must have the state passed to them to execute on. To illustrate this, let’s take a look at two smart contracts for a counter, one in Solidity on Ethereum and one using Rust on Solana.
Ethereum Counter Smart Contract
contract Counter {
  int private count = 0;
  function incrementCounter() public {
    count += 1;
  }
  function getCount() public constant returns (int) {
    return count;
  }
}
Solana Counter Program
#[program]
pub mod counter_anchor {
  use super::*;
  pub fn initialize_counter(_ctx: Context<InitializeCounter>) -> Result<()> {
    Ok(())
  }
  pub fn increment(ctx: Context<Increment>) -> Result<()> {
    ctx.accounts.counter.count = ctx.accounts.counter.count.checked_add(1).unwrap();
    Ok(())
  }
}

#[derive(Accounts)]
pub struct InitializeCounter<'info> {
  #[account(mut)]
  pub payer: Signer<'info>,
  #[account(
    init,
    space = 8 + Counter::INIT_SPACE,
    payer = payer
  )]
  pub counter: Account<'info, Counter>,
  pub system_program: Program<'info, System>,
}

#[derive(Accounts)]
pub struct Increment<'info> {
  #[account(mut)]
  pub counter: Account<'info, Counter>,
}

#[account]
#[derive(InitSpace)]
pub struct Counter {
  count: u64,
}
While in Solidity, you have int private count = 0;, you have a struct within the Rust smart contract stating initialize_counter. This initial counter creates an account with a count of 0, which you then can pass this account to increment to add to the count. This is not to have state within the smart contract itself.
There are separate accounts that store the data outside of the program. To execute the logic in a program, you would pass the account you want to perform on. In the case of this counter program, you pass a counter account to the program when calling the increment function, and the program will increment the value in the counter account.
What are the benefits of the Solana Account Model?
One of the most significant benefits of the Solana Account Model is program reusability.
Take ERC20 for example. ERC20 defines an interface specification on Ethereum for tokens. Every time someone wants to make a new token, the developer will have to redeploy the ERC20 smart contract onto Ethereum with its specified values, incurring the high cost of the redeployment.
Solana is different. You do not have to redeploy another smart contract onto the blockchain when creating new tokens. Instead, you create a new account, known as the mint account, off of the Solana Token Program, where the account defines a set of values to give the number of tokens in circulation, decimal points, who can mint more tokens, and who can freeze tokens.
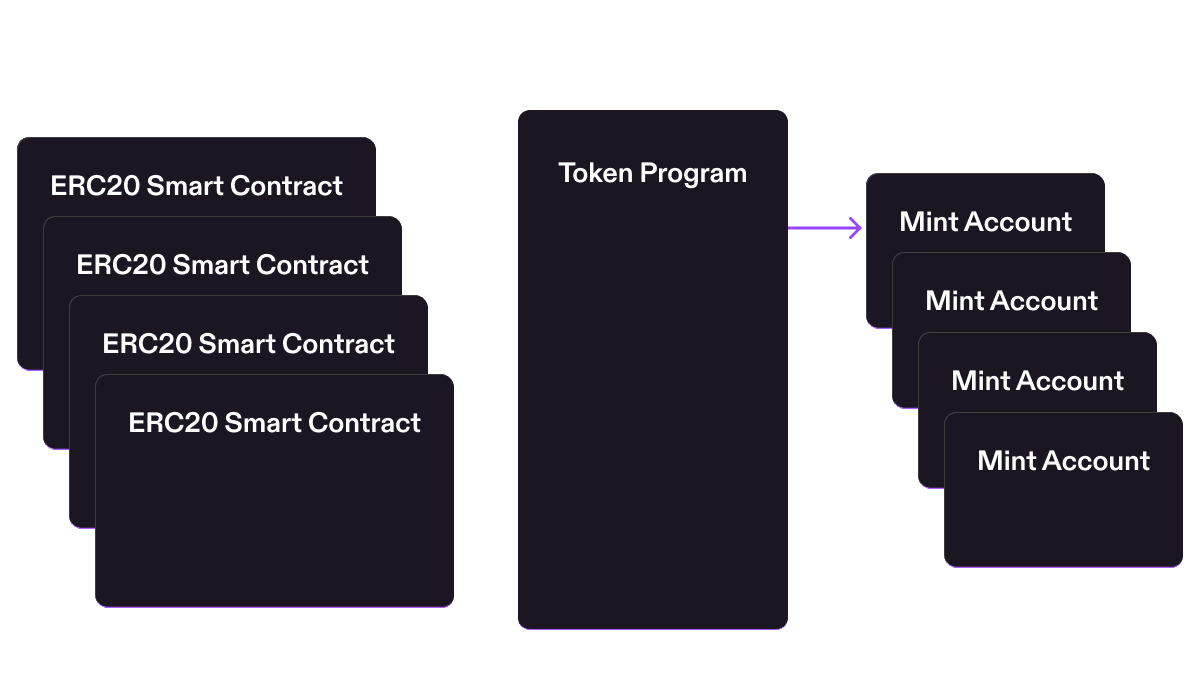
You do not need to write any Rust or smart contracts to deploy a new token on Solana. Send a transaction to the Token Program to create a new token in your language of choice, and the token will then appear in your wallet. With the Solana Program Library CLI, you can do this in a single command:
$ spl-token create-tokenLocal Fee Markets
Another fortunate side effect of having the Solana account model is the ability to model fees based on state contention. As mentioned earlier, transactions can be executed in parallel. However, they are only executed in parallel based on what accounts are being written to. For example, let's say there is a popular NFT mint going on Solana. Typically, this popularity would increase the prices for everyone using the chain, but instead, everyone not participating in the NFT mint is unaffected.
As the name suggests, fee markets are local per account. If you're sending a transfer of USDC to someone while everyone else is minting the hottest new NFT, you will be unaffected and continue paying the low fee you're used to on Solana. This works with any application in Solana, avoiding the common global fee market you're used to on Ethereum while lowering everyone's cost.
Bagaimana cara kerja biaya di Solana?
Biaya di Solana dibagi menjadi beberapa kategori: Biaya Dasar, Biaya Prioritas, dan rent.
Biaya Dasar dapat dihitung berdasarkan jumlah tanda tangan dalam sebuah transaksi. Setiap tanda tangan dikenakan biaya 5000 lamport (0,000000001 sol = 1 lamport). Jika transaksi Anda memerlukan 5 tanda tangan, biaya dasarnya adalah 25000 lamport. Biaya dasar ini menambahkan tekanan ekonomi pada verifikasi tanda tangan kluster, yang merupakan salah satu tindakan yang paling intensif komputasi. Setengah dari biaya dasar dibakar, dan setengahnya diberikan sebagai hadiah kepada validator.
Biaya Prioritas adalah biaya opsional yang dapat ditambahkan siapa saja ke transaksi untuk memberikan prioritas atas transaksi lain yang dieksekusi pada waktu yang sama. Biaya prioritas diukur berdasarkan jumlah unit komputasi yang digunakan dalam sebuah transaksi. Unit komputasi mirip dengan Gas di Ethereum, yaitu pengukuran sederhana dari sumber daya komputasi yang diperlukan untuk suatu transaksi. Seperti Ethereum, prioritas transaksi Anda dihitung berdasarkan hasil perkalian harga unit komputasi dan unit komputasi yang digunakan, atau biaya prioritas = unit komputasi * harga unit komputasi. Seperti biaya dasar, setengah dari biaya prioritas dibakar, dan setengahnya diberikan sebagai hadiah kepada validator.
Biaya terakhir, rent, lebih bersifat seperti deposit daripada biaya. Ketika Anda membuat akun atau mengalokasikan ruang di jaringan, Anda harus menyetorkan sejumlah SOL agar jaringan dapat menyimpan akun Anda. rent dihitung berdasarkan jumlah byte yang tersimpan di jaringan, dan biaya dasar tambahan dikenakan untuk mengalokasikan ruang. Penting untuk diperhatikan bahwa biaya rent tidak hilang; biaya tersebut dapat dikumpulkan kembali jika Anda menutup akun dan mengizinkan ruang yang dialokasikan untuk diklaim kembali oleh kluster.
Bagaimana transaksi bekerja di Solana?
Karena setiap biaya dibayar saat mengeksekusi transaksi, penting untuk memahami cara kerja transaksi. Sebuah transaksi terdiri dari tiga bagian:
- satu atau lebih instruksi
- sebuah array akun untuk dibaca atau ditulis
- satu atau lebih tanda tangan
- blockhash terbaru atau nonce
Sebuah instruksi adalah logika eksekusi terkecil di Solana. Instruksi adalah panggilan untuk memperbarui status global Solana. Instruksi memanggil program yang melakukan panggilan ke runtime Solana untuk memperbarui status (misalnya, memanggil token program untuk mentransfer token dari akun Anda ke akun lain). Anda dapat menganggap instruksi seperti pemanggilan fungsi pada smart contract Ethereum.
Perbedaan signifikan antara Ethereum dan Solana adalah jumlah pemanggilan fungsi dalam satu transaksi karena jumlah instruksi. Memiliki beberapa instruksi per transaksi menguntungkan developer karena mereka tidak perlu membuat smart contract khusus untuk merangkai fungsi dalam satu transaksi. Setiap instruksi dapat berupa pemanggilan fungsi terpisah, yang dilakukan secara berurutan dalam transaksi. Transaksi bersifat atomik, artinya jika salah satu instruksi gagal, seluruh transaksi akan gagal, dan Anda hanya akan membayar biaya transaksi. Ini seperti kegagalan transaksi akibat tidak menetapkan slippage yang benar di Ethereum.
Perbedaan kunci lain yang perlu diingat adalah penggunaan blockhash terbaru alih-alih nonce inkremental untuk transaksi. Ketika sebuah wallet ingin melakukan transaksi, blockhash terbaru akan diambil dari cluster untuk membuat transaksi yang valid. Blockhash terbaru ini hanya membuat transaksi valid selama 150 blok setelah blockhash terbaru diambil. Ini mencegah tanda tangan transaksi yang berumur panjang dari dieksekusi pada tanggal yang jauh lebih lambat.
Cross-Program Invocation (CPI)
Sebuah Cross-Program Invocation (CPI) adalah ketika satu program Solana memanggil instruksi pada program lain saat transaksi asli sedang dieksekusi. CPI adalah cara utama program-program Solana saling berkomposisi, tetapi model akun mengubah cara Anda merancang call graph: transaksi harus menyertakan setiap akun yang akan dibaca atau ditulis oleh seluruh rantai CPI sebelum eksekusi dimulai.
Callee hanya mewarisi hak signer dan writable yang diterima caller, dan callee menggunakan anggaran komputasi transaksi yang sama. Gunakan invoke ketika semua signer yang diperlukan telah menandatangani transaksi asli. Gunakan invoke_signed ketika program pemanggil perlu menandatangani salah satu PDA-nya dengan signer seeds.
Tingkat komitmen
Pembacaan RPC, langganan, dan logika konfirmasi transaksi dapat memilih tingkat commitment. Ini adalah versi Solana dari memutuskan berapa banyak konfirmasi blok Ethereum yang harus ditunggu, kecuali tingkatannya bersifat eksplisit:
processed: tampilan terbaru yang telah diproses oleh node. Gunakan hanya untuk UI optimistis atau alur yang dapat mentolerir rollback.confirmed: blok yang telah divoting oleh supermayoritas stake. Gunakan sebagai default untuk sebagian besar konfirmasi produksi dan status transaksi yang menghadap pengguna.finalized: status konfirmasi terkuat. Gunakan sebelum tindakan off-chain yang tidak dapat dibalik seperti pembayaran fiat, pengiriman barang, atau catatan penyelesaian akhir.
Jika metode RPC menerima commitment dan Anda mengabaikannya, defaultnya biasanya finalized. Klien produksi tetap harus menetapkan commitment secara eksplisit agar latensi UI, perilaku indexer, dan kebijakan penyelesaian bersifat disengaja.
What are the limitations of transactions on Solana?
Like Ethereum gas limitations, there are specific compute unit limitations on transactions for Solana. Each limitation can be found below:
| Ethereum | Solana | |
| Single Transaction Compute Cap | 30,000,000 | 1,400,000 Compute Units |
| Block Compute Cap | 30,000,000 Gas | 48,000,000 Compute Units |
Solana memiliki beberapa batasan tambahan yang diterapkan pada transaksi. Setiap akun yang direferensikan dapat menggunakan paling banyak 12.000.000 unit komputasi per blok. Batasan ini mencegah orang dari write-locking satu akun terlalu banyak kali dalam satu blok, sehingga mencegah pasar biaya lokal dikuasai oleh satu akun.
Rantai panggilan CPI juga sengaja dibuat dangkal. Solana saat ini membatasi kedalaman panggilan CPI hingga 4; stack instruksi mencakup instruksi asli ditambah frame CPI yang bersarang. Jika sebuah program melebihi kedalaman tersebut, runtime mengembalikan error CallDepth dan transaksi gagal. Ratakan call graph yang dalam atau pisahkan alur ke beberapa transaksi.
Reentrancy
Solana tidak memerlukan guard nonReentrant bergaya EVM untuk serangan A -> B -> A yang umum. Runtime memblokir reentrancy tidak langsung dengan ReentrancyNotAllowed, sementara self-rekursi langsung seperti A -> A -> A hanya diizinkan dalam batas kedalaman stack dan komputasi. Pergeseran keamanan praktisnya bukan "abaikan reentrancy"; melainkan "validasi akun dan target CPI dengan cermat, karena penyerang mengendalikan daftar akun dan instruction data yang mereka masukkan ke program Anda."
Where is the Mempool?
Unlike Ethereum, Mempools don’t exist on Solana. Solana validators forward transactions to up to the following four leaders on the leader schedule. While Solana doesn’t have a mempool, it still has priority fees to help order transactions. Not having a mempool forces the transactions to hop from leader to leader until blockhash expiration, but it reduces the overhead of gossip communicating the mempool across the cluster.
Where can I find smart contract code?
In the EVM world, most are familiar with finding smart contract code on Etherscan when viewing the smart contract address. However, viewing smart contract code on an explorer in the Solana ecosystem is relatively new and needs to be established compared to EVM standards. At the time of writing, Solana.fm is the only explorer that supports viewing smart contract code based on verifiable builds.
You can find the smart contract code by visiting a smart contract address the explorer. For example, going to the Phoenix smart contract, you can find the smart contract’s code under the verification tab. From here, you can analyze the code and understand if the smart contract is something you want to interact with.
What are the differences in the developer environment?
Programming languages
EVM primarily uses Solidity to write smart contracts, while Solana uses Rust. There is a framework called the Anchor framework that allows you to build in Rust with many of the tools you are familiar with from EVM, but it is still Rust. If you want to stick with Solidity while building on Solana, a project named Neon enables using Solidity. Neon comes with many of the tools you are familiar with, such as using Foundry or Hardhat during development. Using Neon may get you up and running faster, building on Solana, but you would need more composability outside of the Neon ecosystem with other Solana projects.
Like Ethereum, on the client side, you can find comparable SDKs for all your favorite programming languages on Solana.
| Language | SDK |
| Javascript | solana/web3.js |
| Rust | solana_sdk |
| Python | solana-py |
| Java | solanaj |
| C++ | solcpp |
| C# | Solnet |
| GoLang | solana-go |
Where are the tools I’m familiar with from EVM?
As you migrate from EVM to building on Solana, you may be looking for the tools you are familiar with. Currently, the Solana ecosystem does not have tooling equal to Foundry but has a decent amount of other equivalents to the tools you are used to.
| Tool | Solana Equivalent |
| HardHat | Solana Test Validator |
| Brownie | Program-test, BankRun.js |
| Ethers, Wagmi | @solana/web.js |
| Remix | Solana Playground |
| ABI | Anchor Framework's IDL |
| Etherscan | SolanaFM, XRay |
| scaffold-eth | create-solana-dapp |
Apa yang berbeda dalam pengembangan smart contract?
Ada beberapa hal yang perlu diperhatikan saat Anda membangun program di Solana atau memigrasikan smart contract Ethereum Anda.
Daftar periksa keamanan untuk developer EVM
Tinjauan keamanan Solana beralih dari guard reentrancy EVM ke validasi akun dan CPI yang eksplisit. Sebelum men-deploy program yang telah dimigrasikan, periksa:
- Validasi owner setiap akun, alamat atau PDA seeds, discriminator, panjang data, dan hubungannya dengan akun lain dalam instruksi.
- Wajibkan setiap otoritas sebagai signer eksplisit atau PDA yang tervalidasi. Tidak ada
msg.senderimplisit. - Tolak akun mutable duplikat ketika instruksi mengharapkan saldo, vault, atau akun konfigurasi yang terpisah.
- Tetapkan target CPI ke ID program yang diharapkan, dan pastikan akun yang disuplai penyerang tidak dapat diganti ke dalam daftar akun CPI.
- Lindungi jalur inisialisasi dari reinisialisasi akun yang sudah ada, terutama saat menggunakan helper seperti
init_if_needed. - Tutup akun dengan menguras lamport dan menandai status sebagai tertutup agar tidak dapat dihidupkan kembali di kemudian hari dalam transaksi yang sama.
- Gunakan math yang diperiksa dan verifikasi desimal token, alamat mint, dan varian token-program sesuai dengan asumsi Solidity asli Anda.
- Uji substitusi akun, pemalsuan signer, ID program CPI arbitrer, akun writable duplikat, reinisialisasi, penutupan akun, dan pembacaan usang setelah CPI.
Sebagai contoh, jika Anda mencari mapping seperti yang biasa Anda gunakan pada smart contract Ethereum, tipe ini tidak ada secara langsung di Solana. Sebagai gantinya, Anda menggunakan program-derived addresses, atau PDA disingkat. Seperti mapping, program-derived addresses dapat memberi Anda kemampuan untuk membuat peta dari sebuah kunci atau akun ke nilai yang tersimpan di onchain. Cara pemetaannya berbeda dari Ethereum.
Misalkan Anda ingin memetakan akun pengguna ke saldo mereka di onchain. Di Solidity, Anda melakukan sesuatu seperti berikut:
mapping(address => uint) public balances;With program derived addresses, you instead have to do the following:
Client:
const [BALANCE_PDA] = await anchor.web3.PublicKey.findProgramAddress(
  [Buffer.from("BALANCE"), pg.wallet.publicKey.toBuffer()],
  pg.program.programId
);
Program:
#[derive(Accounts)]
#[instruction(restaurant: String)]
pub struct BalanceAccounts<'info> {
    #[account(
        init_if_needed,
        payer = signer,
        space = 500,
        seeds = [balance.as_bytes().as_ref(), signer.key().as_ref()],
        bump
    )]
    pub balance: Account<'info, BalanceAccount>,
    #[account(mut)]
    pub signer: Signer<'info>,
    pub system_program: Program<'info, System>,
}

#[account]
pub struct BalanceAccount {
    pub balance: u8
}
The map's key is derived from the combination of the "balance" string and the signer's public key, while the program derived address provides the location to look up the map's value. Program derived addresses have more functionality than just providing a map; we can learn about that later.
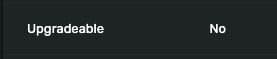
In Solidity, the ability to upgrade your smart contracts using proxy contracts has become the norm. On Solana, programs are default upgradable without any special work involved. Each smart contract can be upgraded by a CLI command solana program deploy <program_filepath. While programs are default upgradable, you can still demote their status to immutable with solana program set-upgrade-authority <program_address> --final. Once immutable, the program will be flagged as not upgradable on the explorers.
A common thing you do when writing a solidity smart contract is check for either msg.sender or tx.origin. There isn't an equivalent on Solana because each transaction can have multiple signers. Also the person sending the transaction is not necessarily the one who signed the transaction because you have someone else pay for your transactions.
Let’s take a look at this basic Solana Program:
#[program]
pub mod gettingSigners {
    use super::*;

    pub fn initialize(ctx: Context<Initialize>) -> Result<()> {
        let the_signer: &mut Signer = &mut ctx.accounts.the_signer;

        msg!("The signer: {:?}", *the_signer.key);

        Ok(())
    }
}

#[derive(Accounts)]
pub struct Initialize<'info> {
    #[account(mut)]
    pub the_signer: Signer<'info>,
}
This will output a signer of the transaction as part of your program logs. As mentioned before, you can have multiple signers:
#[program]
pub mod gettingSigners {
    use super::*;

    pub fn initialize(ctx: Context<Initialize>) -> Result<()> {
        let the_signer: &mut Signer = &mut ctx.accounts.first_signer;

        msg!("The signer: {:?}", *the_signer.key);

        Ok(())
    }
}

#[derive(Accounts)]
pub struct Initialize<'info> {
    #[account(mut)]
    pub first_signer: Signer<'info>,
    pub second_signer: Signer<'info>,
}
The above example shows that this specific program has multiple signers, first_signer and second_signer. We cannot necessarily tell which one is the payer, but we know both have signed the transaction. You can learn more about getting signers on Rareskills.
How do I build my EVM project on Solana?
Let’s take a simple project built in Solidity and go through the process of building the same project on Solana. A common first project you run into is a voting project. The Solidity smart contract would look like this:
pragma solidity ^0.6.4;

contract Voting {

    mapping (bytes32 => uint256) public votesReceived;

    bytes32[] public candidateList;

    constructor(bytes32[] memory candidateNames) public {
        candidateList = candidateNames;
    }

    function voteForCandidate(bytes32 candidate) public {
        require(validCandidate(candidate));
        votesReceived[candidate] += 1;
    }

    function totalVotesFor(bytes32 candidate) view public returns (uint256) {
        require(validCandidate(candidate));
        return votesReceived[candidate];
    }

    function validCandidate(bytes32 candidate) view public returns (bool) {
        for(uint i = 0; i < candidateList.length; i++) {
            if (candidateList[i] == candidate) {
                return true;
            }
        }
        return false;
    }
}
We quickly noticed a few things that were not available in Solana programs. View functions and mapping need to be done differently. Let’s start building this program on Solana!
Let’s create our very basic Solana program shell:
use anchor_lang::prelude::*;

declare_id!("6voY4gV7kzuGr4hE2xjZnkdagFGNhEe8WonZ8UtdPWig");

#[program]
pub mod voting {
    use super::*;

    pub fn init_candidate(ctx: Context<InitializeCandidate>) -> Result<()> {
        Ok(())
    }

    pub fn vote_for_candidate(ctx: Context<VoteCandidate>) -> Result<()> {
        Ok(())
    }
}

#[derive(Accounts)]
pub struct InitializeCandidate {}

#[derive(Accounts)]
pub struct VoteCandidate {}
We have two functions in our voting program, init_candidate and vote_for_candidate. The init_candidate function maps directly to our constructor in the Solidity smart contract, while vote_for_candidate maps one-to-one with voteForCandidate in Solidity.
One problem with init_candidate today is that it can be called by anyone permissionless, unlike the constructor in Solidity only being called by the contract deployer. To solve this, we will employ a similar feature to onlyOwner from Solidity. We set a specific address on the Solana program that is the only one that can execute the instruction.
Let’s say our publicKey is 8os8PKYmeVjU1mmwHZZNTEv5hpBXi5VvEKGzykduZAik. By adding a reference to this publicKey in the Solana program and requiring the signer to match, we effectively emulate both onlyOwner and the constructor.
use anchor_lang::prelude::*;

declare_id!("6voY4gV7kzuGr4hE2xjZnkdagFGNhEe8WonZ8UtdPWig");

const OWNER: &str = "8os8PKYmeVjU1mmwHZZNTEv5hpBXi5VvEKGzykduZAik";

#[program]
pub mod voting {
    use super::*;

    #[access_control(check(&ctx))]
    pub fn init_candidate(ctx: Context<InitializeCandidate>) -> Result<()> {
        Ok(())
    }

    pub fn vote_for_candidate(ctx: Context<VoteCandidate>) -> Result<()> {
        Ok(())
    }
}

#[derive(Accounts)]
pub struct InitializeCandidate<'info> {
    #[account(mut)]
    pub payer: Signer<'info>,
}

#[derive(Accounts)]
pub struct VoteCandidate {}

fn check(ctx: &Context<InitializeCandidate>) -> Result<()> {
    // Check if signer === owner
    require_keys_eq!(
        ctx.accounts.payer.key(),
        OWNER.parse::<Pubkey>().unwrap(),
        OnlyOwnerError::NotOwner
    );
    Ok(())
}

#[error_code]
pub enum OnlyOwnerError {
    #[msg("Only owner can call this function!")]
    NotOwner,
}
We added an access control function check that will check if the signer of init_candidate matches the address listed in the smart contract. If the signer does not match, the OnlyOwnerError will be thrown, and the transaction will fail.
Let’s move on to the next bit in the Solidity smart contract, candidateList and votesReceived. While you can use a Vec in a Solana program similar to bytes32[], managing the payments for changing the size can be a bit of a hassle. Instead, we will utilize Program Derived Addresses given specific candidate name, with the value found at that address being the votesReceived by the candidate.
To use Program Derived Accounts in a Solana Program, you use seeds and bump in the account. First, let’s create the account to track votesReceived.
#[account]
#[derive(InitSpace)]
pub struct Candidate {
    pub votes_received: u8,
}
#[account] denotes the struct as a Solana account, while the #[derive(InitSpace)] is a useful macro for auto-calculating the space required to allocate for Candidate. The votes_received can hold a count just like votesReceived in the Solidity smart contract.
Expanding the InitializeCandidate and VoteCandidate, we get the following:
#[derive(Accounts)]
#[instruction(_candidate_Name: String)]
pub struct InitializeCandidate<'info> {
    #[account(mut)]
    pub payer: Signer<'info>,

    #[account(
        init,
        space = 8 + Candidate::INIT_SPACE,
        payer = payer,
        seeds = [_candidate_Name.as_bytes().as_ref()],
        bump,
    )]
    pub candidate: Account<'info, Candidate>,
    pub system_program: Program<'info, System>,
}

#[derive(Accounts)]
#[instruction(_candidate_Name: String)]
pub struct VoteCandidate<'info> {
    #[account(
        mut,
        seeds = [_candidate_Name.as_bytes().as_ref()],
        bump,
    )]
    pub candidate: Account<'info, Candidate>,
}
Wow, that’s a lot of new code in the accounts. Let’s unpack it.
First you’ll notice #[instruction(_candidate_Name: String)]. This means the context for InitializeCandidate expects a string _candidate_name to be passed into the instruction. We can see later this is used in seeds = [_candidate_name.as_bytes().as_ref()]. This means that the seed of the PDA will be _candidate_Name, and the value stored at the PDA will be the candidate’s votes_received.
Next you may have some questions on space = 8 + Candidate::INIT_SPACE. The Candidate::INIT_SPACE is how big the Candidate account is + 8, 8 being the bytes added at the beginning of Anchor framework accounts for security checks. pub system_program: Program<'info, System>, is required when you’re creating an account, which is denoted by init. This means that any time an instruction using the InitializeCandidate context is called, the instruction will try to create a candidate account.
Now let’s add the business logic found in voteForCandidate from the Solidity smart contract.
pub fn vote_for_candidate(ctx: Context<VoteCandidate>, _candidate_name: String) -> Result<()> {
    ctx.accounts.candidate.votes_received += 1;
    Ok(())
}
Here we take an additional parameter discussed earlier, _candidate_name . This will help match to the exact account we’re referencing for the candidate. We then increment the votes by 1 for that candidate.
That’s all we need to complete on the Solana program side, with the final Solana program looking like this:
use anchor_lang::prelude::*;

declare_id!("6voY4gV7kzuGr4hE2xjZnkdagFGNhEe8WonZ8UtdPWig");

const OWNER: &str = "8os8PKYmeVjU1mmwHZZNTEv5hpBXi5VvEKGzykduZAik";

#[program]
pub mod voting {
    use super::*;

    #[access_control(check(&ctx))]
    pub fn init_candidate(ctx: Context<InitializeCandidate>, _candidate_name: String) -> Result<()> {
        Ok(())
    }

    pub fn vote_for_candidate(ctx: Context<VoteCandidate>, _candidate_name: String) -> Result<()> {
        ctx.accounts.candidate.votes_received += 1;
        Ok(())
    }
}

#[derive(Accounts)]
#[instruction(_candidate_name: String)]
pub struct InitializeCandidate<'info> {
    #[account(mut)]
    pub payer: Signer<'info>,

    #[account(
        init,
        space = 8 + Candidate::INIT_SPACE,
        payer = payer,
        seeds = [_candidate_name.as_bytes().as_ref()],
        bump,
    )]
    pub candidate: Account<'info, Candidate>,
    pub system_program: Program<'info, System>,
}

#[derive(Accounts)]
#[instruction(_candidate_name: String)]
pub struct VoteCandidate<'info> {
    #[account(
        mut,
        seeds = [_candidate_name.as_bytes().as_ref()],
        bump,
    )]
    pub candidate: Account<'info, Candidate>,
}

#[account]
#[derive(InitSpace)]
pub struct Candidate {
    pub votes_received: u8,
}

fn check(ctx: &Context<InitializeCandidate>) -> Result<()> {
    // Check if signer === owner
    require_keys_eq!(
        ctx.accounts.payer.key(),
        OWNER.parse::<Pubkey>().unwrap(),
        OnlyOwnerError::NotOwner
    );
    Ok(())
}

#[error_code]
pub enum OnlyOwnerError {
    #[msg("Only owner can call this function!")]
    NotOwner,
}
Now you might think, “But wait, what about totalVotesFor and validCandidate from the Solidity smart contract?” validCandidate is already accounted for because vote_for_candidate will fail if you pass an account that does not exist. totalVotesFor can be done client-side with Typescript and does not need to exist within the Solana program.
Now that we’ve built the Solana program, let’s interact with it.
Loading the program into Solana Playground, I can build and deploy it to Devnet. Once you build and deploy the program, you’ll find that you can run tests with the instructions on the test tab.
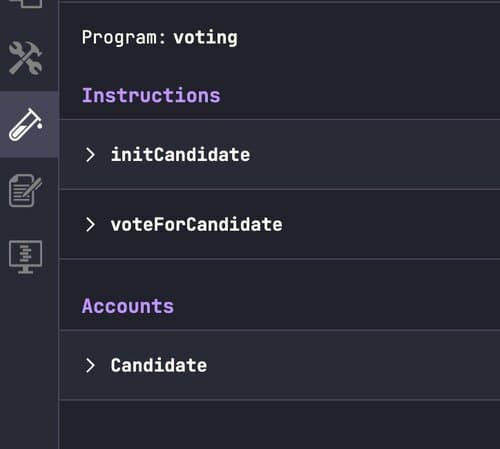
This is akin to using Remix to test your Solidity smart contract. Opening up initCandidate and entering the name John Smith as the candidate name, we now have to generate the PDA for John Smith. Click on the candidate account finder and select From seed. Select the custom String and input John Smith, and finally click generate. Congratulations, you just found your PDA for John Smith! Now hit Test to execute the instruction.
If all is successful, you should see the following program logs on the test transaction.
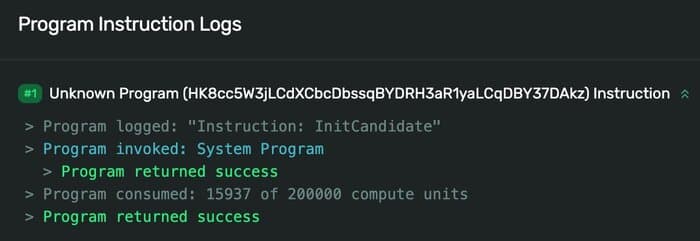
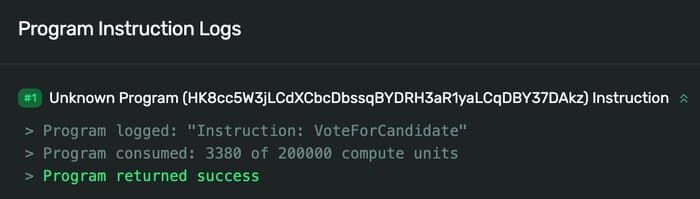
Now let’s vote for John Smith ! Opening up the
voteForCandidate instruction, type in John Smith and
generate the same PDA again. Hit Test to vote for your first
candidate!
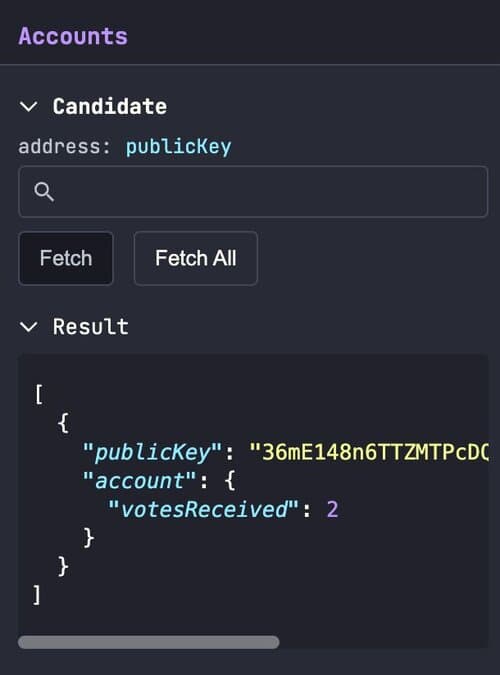
Now that you’ve voted, how can you check how many votes the candidate has?
Head on over to Candidate under Accounts on the test
tab and hit the button Fetch All. This will grab all valid
candidates and their votes. From there you’ll receive an array of the
candidates, their account addresses, and their votes.
Congratulations! You just took the voting Solidity smart contract and translated into a Solana program. You can use a lot of the same techniques on other Solidity smart contracts to build what you have on EVM on Solana. If you’re interested to learn more about Solana, check out the documentation and get started today.