솔라나 네트워크와 상호작용하려면 트랜잭션을 보내야 합니다. 트랜잭션은 여러 양식을 담고 있는 봉투라고 생각할 수 있습니다. 각 양식은 네트워크에 무엇을 해야 할지 알려주는 명령어입니다. 트랜잭션을 보내는 것은 양식이 처리될 수 있도록 봉투를 우편으로 보내는 것과 같습니다.
아래 예시는 두 개의 트랜잭션을 간소화한 버전을 보여줍니다. 첫 번째 트랜잭션이 처리되면 단일 명령어가 실행됩니다. 두 번째 트랜잭션이 처리되면 순차적으로 세 개의 명령어가 실행됩니다: 먼저 명령어 1, 그 다음 명령어 2, 마지막으로 명령어 3이 실행됩니다.
트랜잭션은 원자적입니다: 단일 명령어가 실패하면 전체 트랜잭션이 실패하고 어떠한 변경도 발생하지 않습니다.
두 개의 트랜잭션을 보여주는 간소화된 다이어그램
Transaction는
다음 정보로 구성됩니다:
signatures: 서명 배열message: 처리할 명령어 목록을 포함한 트랜잭션 정보
pub struct Transaction {#[wasm_bindgen(skip)]#[serde(with = "short_vec")]pub signatures: Vec<Signature>,#[wasm_bindgen(skip)]pub message: Message,}
 트랜잭션의 두 부분을 보여주는 다이어그램
트랜잭션의 총 크기 제한은
1232
바이트입니다. 이 제한에는 signatures 배열과
message 구조체가 모두 포함됩니다.
이 제한은 일반적인 인터넷 인프라에서 패킷 단편화를 방지하기 위해 설계되었습니다. IPv6는 9000바이트 이상의 MTU를 지원하지만, 대부분의 인터넷 라우터는 기본 MTU로 1500바이트(표준 이더넷)를 사용합니다. 단편화 없이 트랜잭션이 단일 패킷에 맞도록 하기 위해, 솔라나는 1280바이트(IPv6에 필요한 최소 MTU)에서 네트워크 헤더용 48바이트(IPv6 40바이트 + 단편화/UDP 헤더 8바이트)를 뺀 1232바이트의 트랜잭션 크기 제한을 사용합니다.
 트랜잭션 형식과 크기 제한을 보여주는 다이어그램
서명
트랜잭션의 signatures 배열은 Signature 구조체를 포함합니다. 각
Signature는
64바이트이며 계정의 개인 키로 트랜잭션의 Message에 서명하여 생성됩니다.
트랜잭션의 명령어에 포함된 각 서명자 계정에 대해 서명이
제공되어야 합니다.
첫 번째 서명은 트랜잭션의 기본 수수료를 지불할 계정에 속하며 트랜잭션 서명입니다. 트랜잭션 서명은 네트워크에서 트랜잭션의 세부 정보를 조회하는 데 사용할 수 있습니다.
메시지
트랜잭션의 message는
Message
구조체이며 다음 정보를 포함합니다:
header: 메시지 헤더account_keys: 트랜잭션의 명령어에 필요한 계정 주소 배열recent_blockhash: 트랜잭션의 타임스탬프 역할을 하는 블록해시instructions: 명령어 배열
공간을 절약하기 위해 트랜잭션은 각 계정의 권한을 개별적으로 저장하지 않습니다.
대신 계정 권한은 header와 account_keys를 사용하여 결정됩니다.
pub struct Message {/// The message header, identifying signed and read-only `account_keys`.pub header: MessageHeader,/// All the account keys used by this transaction.#[serde(with = "short_vec")]pub account_keys: Vec<Pubkey>,/// The id of a recent ledger entry.pub recent_blockhash: Hash,/// Programs that will be executed in sequence and committed in/// one atomic transaction if all succeed.#[serde(with = "short_vec")]pub instructions: Vec<CompiledInstruction>,}
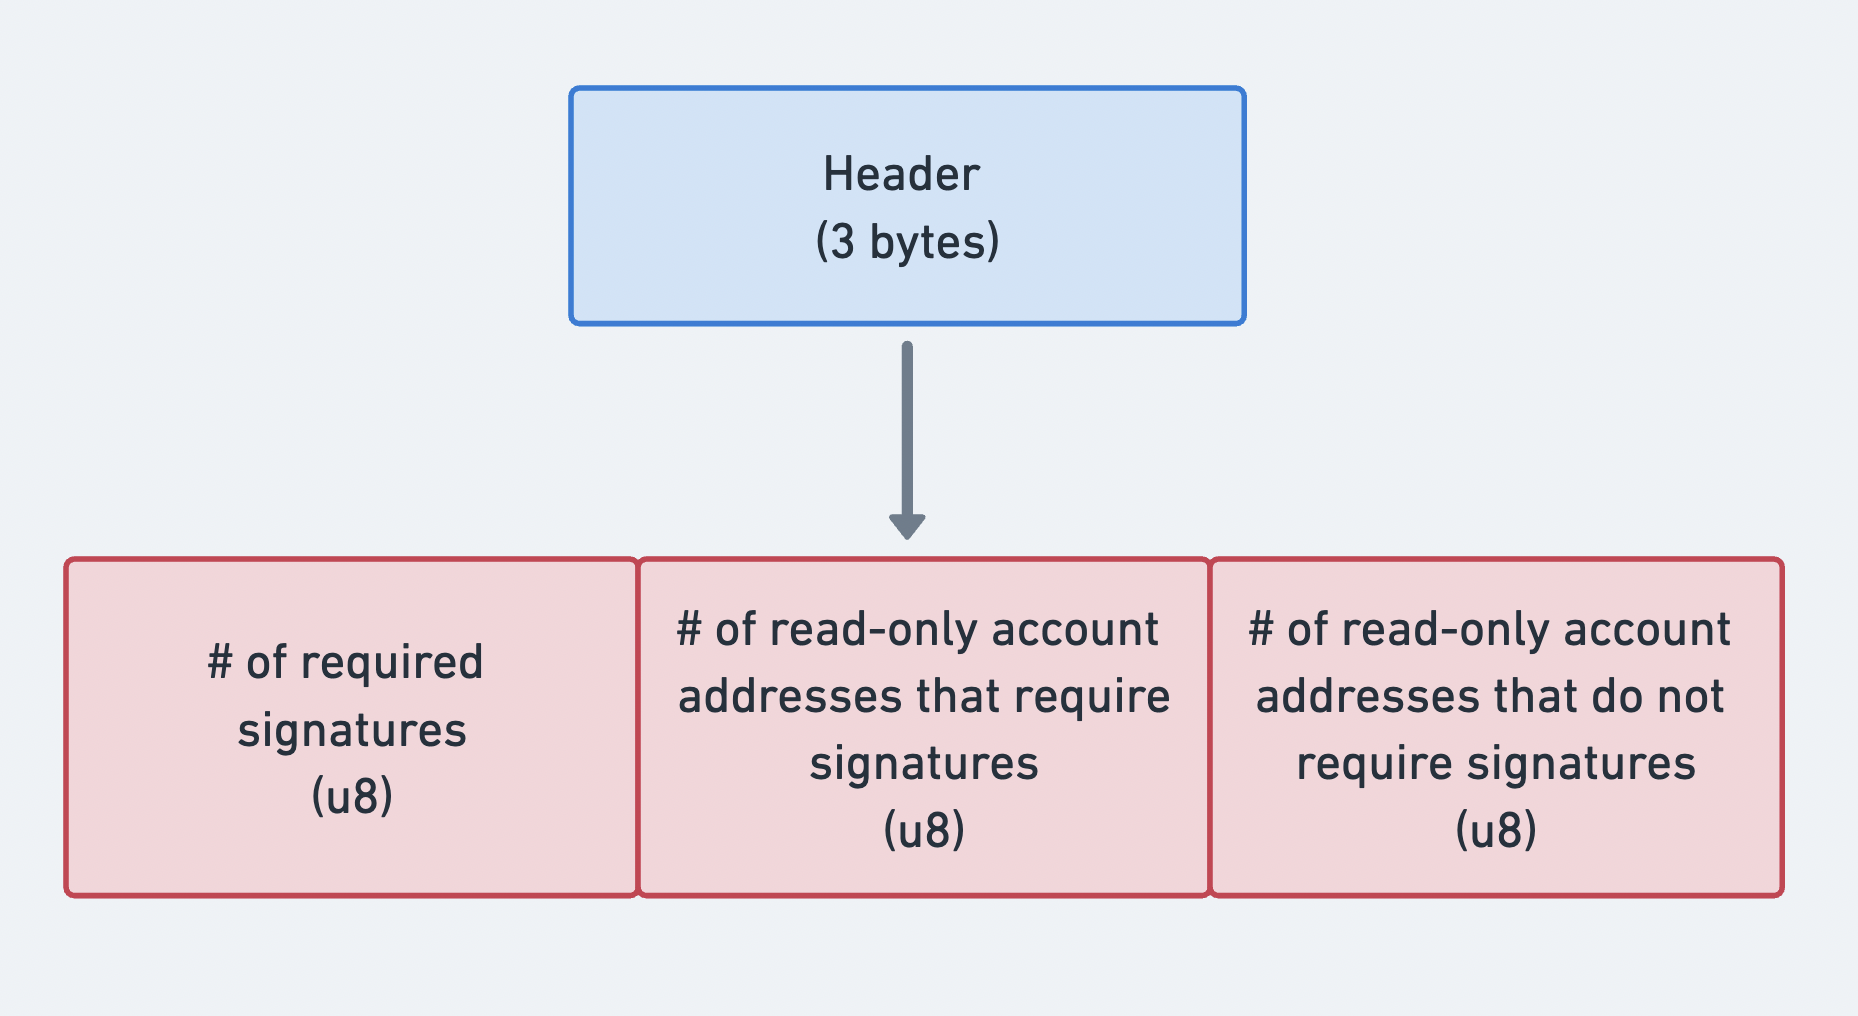
헤더
메시지의 header는
MessageHeader
구조체입니다. 다음 정보를 포함합니다:
num_required_signatures: 트랜잭션에 필요한 총 서명 수num_readonly_signed_accounts: 서명이 필요한 읽기 전용 계정의 총 수num_readonly_unsigned_accounts: 서명이 필요하지 않은 읽기 전용 계정의 총 수
pub struct MessageHeader {/// The number of signatures required for this message to be considered/// valid. The signers of those signatures must match the first/// `num_required_signatures` of [`Message::account_keys`].pub num_required_signatures: u8,/// The last `num_readonly_signed_accounts` of the signed keys are read-only/// accounts.pub num_readonly_signed_accounts: u8,/// The last `num_readonly_unsigned_accounts` of the unsigned keys are/// read-only accounts.pub num_readonly_unsigned_accounts: u8,}
 메시지 헤더의 세 부분을 보여주는 다이어그램
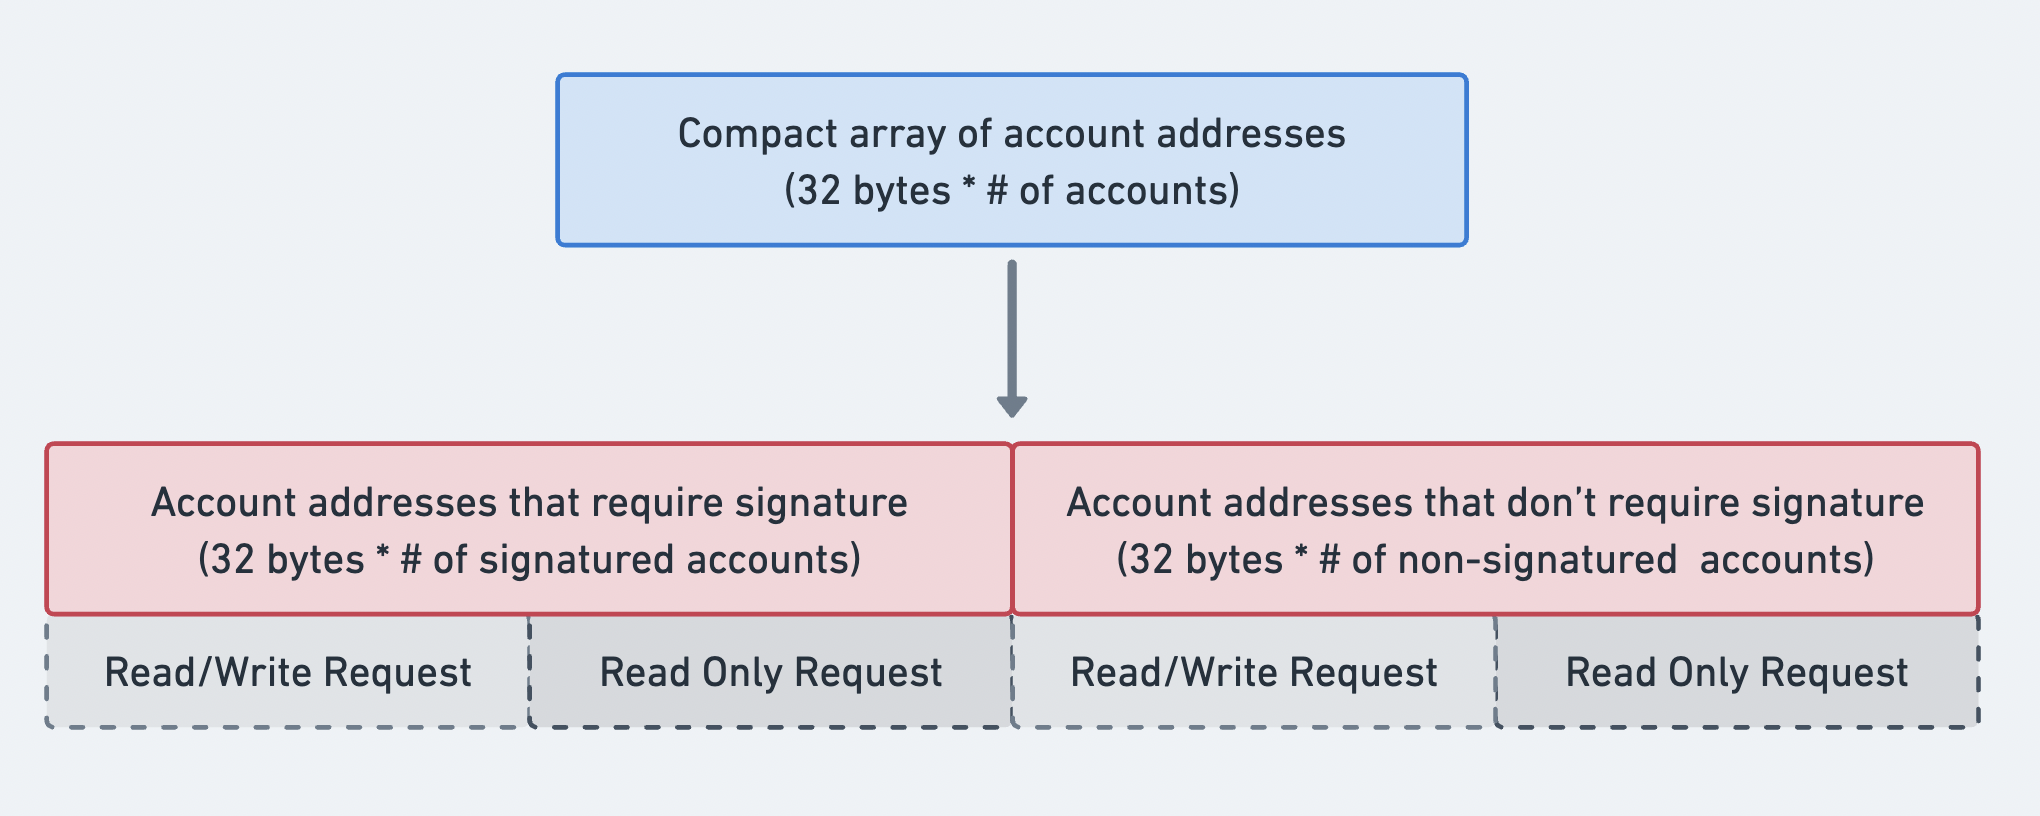
계정 주소
메시지의
account_keys
는 압축 배열 형식으로
전송되는 계정 주소의 배열입니다. 배열의 접두사는 길이를 나타냅니다. 배열의 각
항목은 공개 키로, 명령어에서 사용하는 계정을 가리킵니다. accounts_keys 배열은
완전해야 하며, 다음과 같이 엄격하게 정렬되어야 합니다:
- 서명자 + 쓰기 가능
- 서명자 + 읽기 전용
- 서명자 아님 + 쓰기 가능
- 서명자 아님 + 읽기 전용
엄격한 정렬을 통해 account_keys 배열을 메시지의 header 정보와
결합하여 각 계정의 권한을 결정할 수 있습니다.
 계정 주소 배열의 순서를 보여주는 다이어그램
최근 블록해시
메시지의 recent_blockhash는 트랜잭션 타임스탬프 역할을 하며 중복 트랜잭션을
방지하는 해시 값입니다. 블록해시는
150개 블록
후에 만료됩니다. (각 블록이 400ms라고 가정할 때 1분에 해당합니다.) 블록이 만료된
후에는 트랜잭션이 만료되어 처리할 수 없습니다.
getLatestBlockhash RPC 메서드를
사용하면 현재 블록해시와 블록해시가 유효한 마지막 블록 높이를 가져올 수
있습니다.
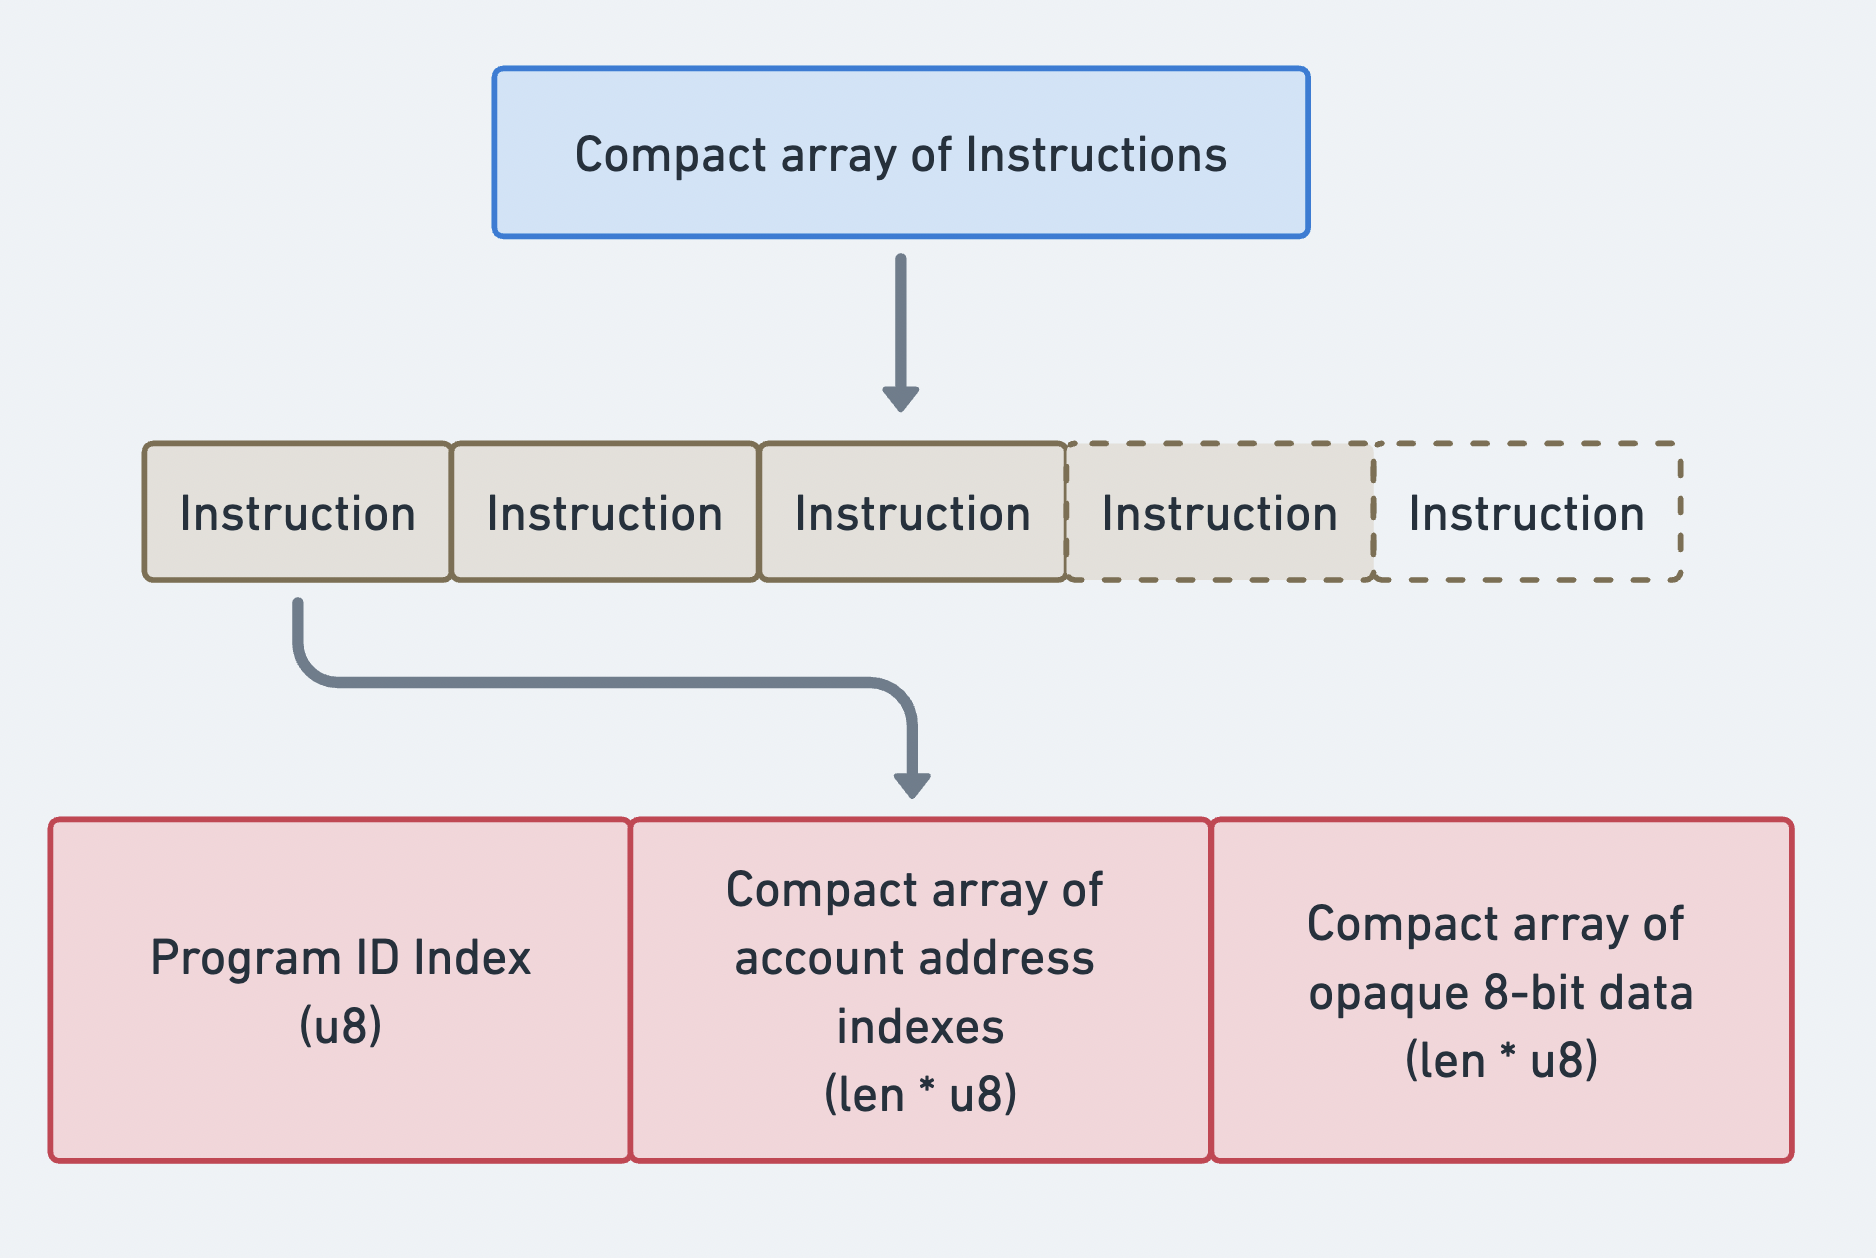
명령어
메시지의
instructions
는 압축 배열 형식으로
전송되는 처리할 모든 명령어의 배열입니다. 배열의 접두사는 길이를 나타냅니다.
배열의 각 항목은
CompiledInstruction
구조체이며 다음 정보를 포함합니다:
program_id_index:account_keys배열의 주소를 가리키는 인덱스입니다. 이 값은 명령어를 처리하는 프로그램의 주소를 나타냅니다.accounts:account_keys배열의 주소를 가리키는 인덱스의 배열입니다. 각 인덱스는 이 명령어에 필요한 계정의 주소를 가리킵니다.data: 프로그램에서 호출할 명령어를 지정하는 바이트 배열입니다. 명령어에 필요한 추가 데이터도 포함합니다. (예: 함수 인수)
pub struct CompiledInstruction {/// Index into the transaction keys array indicating the program account that executes this instruction.pub program_id_index: u8,/// Ordered indices into the transaction keys array indicating which accounts to pass to the program.#[serde(with = "short_vec")]pub accounts: Vec<u8>,/// The program input data.#[serde(with = "short_vec")]pub data: Vec<u8>,}
 명령어의 컴팩트 배열
트랜잭션 구조 예시
다음 예시는 단일 SOL 전송 명령어가 포함된 트랜잭션의 구조를 보여줍니다.
import {createSolanaRpc,generateKeyPairSigner,lamports,createTransactionMessage,setTransactionMessageFeePayerSigner,setTransactionMessageLifetimeUsingBlockhash,appendTransactionMessageInstructions,pipe,signTransactionMessageWithSigners,getCompiledTransactionMessageDecoder} from "@solana/kit";import { getTransferSolInstruction } from "@solana-program/system";const rpc = createSolanaRpc("http://localhost:8899");const { value: latestBlockhash } = await rpc.getLatestBlockhash().send();// Generate sender and recipient keypairsconst sender = await generateKeyPairSigner();const recipient = await generateKeyPairSigner();// Define the amount to transferconst LAMPORTS_PER_SOL = 1_000_000_000n;const transferAmount = lamports(LAMPORTS_PER_SOL / 100n); // 0.01 SOL// Create a transfer instruction for transferring SOL from sender to recipientconst transferInstruction = getTransferSolInstruction({source: sender,destination: recipient.address,amount: transferAmount});// Create transaction messageconst transactionMessage = pipe(createTransactionMessage({ version: 0 }),(tx) => setTransactionMessageFeePayerSigner(sender, tx),(tx) => setTransactionMessageLifetimeUsingBlockhash(latestBlockhash, tx),(tx) => appendTransactionMessageInstructions([transferInstruction], tx));const signedTransaction =await signTransactionMessageWithSigners(transactionMessage);// Decode the messageBytesconst compiledTransactionMessage =getCompiledTransactionMessageDecoder().decode(signedTransaction.messageBytes);console.log(JSON.stringify(compiledTransactionMessage, null, 2));
이전 코드 스니펫의 출력을 아래 코드에서 보여줍니다. SDK마다 형식은 다르지만, 각 명령어가 동일한 필수 정보를 포함하고 있음을 확인하세요.
{"version": 0,"header": {"numSignerAccounts": 1,"numReadonlySignerAccounts": 0,"numReadonlyNonSignerAccounts": 1},"staticAccounts": ["HoCy8p5xxDDYTYWEbQZasEjVNM5rxvidx8AfyqA4ywBa","5T388jBjovy7d8mQ3emHxMDTbUF8b7nWvAnSiP3EAdFL","11111111111111111111111111111111"],"lifetimeToken": "EGCWPUEXhqHJWYBfDirq3mHZb4qDpATmYqBZMBy9TBC1","instructions": [{"programAddressIndex": 2,"accountIndices": [0, 1],"data": {"0": 2,"1": 0,"2": 0,"3": 0,"4": 128,"5": 150,"6": 152,"7": 0,"8": 0,"9": 0,"10": 0,"11": 0}}]}
트랜잭션이 제출된 후에는 트랜잭션 서명과 getTransaction RPC 메서드를 사용하여 세부 정보를 검색할 수 있습니다. 응답은 다음 스니펫과 유사한 구조를 가질 것입니다.
Solana Explorer를 사용하여 트랜잭션을 찾을 수도 있습니다.
{"blockTime": 1745196488,"meta": {"computeUnitsConsumed": 150,"err": null,"fee": 5000,"innerInstructions": [],"loadedAddresses": {"readonly": [],"writable": []},"logMessages": ["Program 11111111111111111111111111111111 invoke [1]","Program 11111111111111111111111111111111 success"],"postBalances": [989995000, 10000000, 1],"postTokenBalances": [],"preBalances": [1000000000, 0, 1],"preTokenBalances": [],"rewards": [],"status": {"Ok": null}},"slot": 13049,"transaction": {"message": {"header": {"numReadonlySignedAccounts": 0,"numReadonlyUnsignedAccounts": 1,"numRequiredSignatures": 1},"accountKeys": ["8PLdpLxkuv9Nt8w3XcGXvNa663LXDjSrSNon4EK7QSjQ","7GLg7bqgLBv1HVWXKgWAm6YoPf1LoWnyWGABbgk487Ma","11111111111111111111111111111111"],"recentBlockhash": "7ZCxc2SDhzV2bYgEQqdxTpweYJkpwshVSDtXuY7uPtjf","instructions": [{"accounts": [0, 1],"data": "3Bxs4NN8M2Yn4TLb","programIdIndex": 2,"stackHeight": null}],"indexToProgramIds": {}},"signatures": ["3jUKrQp1UGq5ih6FTDUUt2kkqUfoG2o4kY5T1DoVHK2tXXDLdxJSXzuJGY4JPoRivgbi45U2bc7LZfMa6C4R3szX"]},"version": "legacy"}
Is this page helpful?