In this article, we dive into the key differences between developing on Ethereum and Solana, guiding you through how to build on Solana. Coming from Ethereum, Solana will look and feel much different and have a diverse toolset to use as you develop. This article will arm you with all the tools necessary to build on Solana from an Ethereum background.
Account Model
When developing on Solana, the most significant difference will run into is the account model design. It is helpful to understand why Solana’s account model was designed differently. Unlike Ethereum, Solana is designed to take advantage of the multiple cores in high-end machines. There is a trend in computing resources where the amount of available cores increases over time and becomes cheaper for people to purchase. Considering this, the account model is designed to leverage multiple cores, creating a system that parallelizes the transactions with each other. This parallelization creates further optimizations, such as local fee markets and faster throughput, which we will explore later.
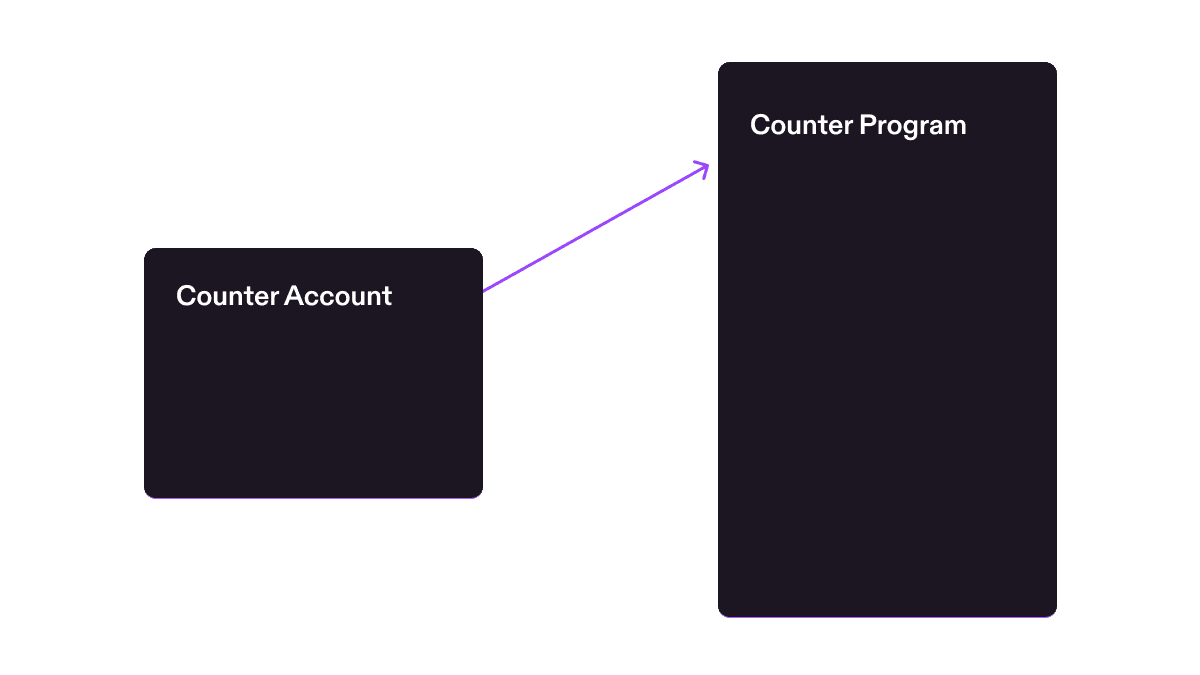
So what is meant by the “account model”? On Solana, accounts are like objects containing some arbitrary data and specific rules for modification. Everything is an account on Solana, including smart contracts. Like Ethereum, each account has an address identifier to help locate an account. However, unlike Ethereum, where each smart contract is an account with the execution logic and storage tied together, Solana’s smart contracts are entirely stateless.
Smart contracts on Solana carry no state of their own and must have the state passed to them to execute on. To illustrate this, let’s take a look at two smart contracts for a counter, one in Solidity on Ethereum and one using Rust on Solana.
Ethereum Counter Smart Contract
contract Counter {
  int private count = 0;
  function incrementCounter() public {
    count += 1;
  }
  function getCount() public constant returns (int) {
    return count;
  }
}
Solana Counter Program
#[program]
pub mod counter_anchor {
  use super::*;
  pub fn initialize_counter(_ctx: Context<InitializeCounter>) -> Result<()> {
    Ok(())
  }
  pub fn increment(ctx: Context<Increment>) -> Result<()> {
    ctx.accounts.counter.count = ctx.accounts.counter.count.checked_add(1).unwrap();
    Ok(())
  }
}

#[derive(Accounts)]
pub struct InitializeCounter<'info> {
  #[account(mut)]
  pub payer: Signer<'info>,
  #[account(
    init,
    space = 8 + Counter::INIT_SPACE,
    payer = payer
  )]
  pub counter: Account<'info, Counter>,
  pub system_program: Program<'info, System>,
}

#[derive(Accounts)]
pub struct Increment<'info> {
  #[account(mut)]
  pub counter: Account<'info, Counter>,
}

#[account]
#[derive(InitSpace)]
pub struct Counter {
  count: u64,
}
While in Solidity, you have int private count = 0;, you have a struct within the Rust smart contract stating initialize_counter. This initial counter creates an account with a count of 0, which you then can pass this account to increment to add to the count. This is not to have state within the smart contract itself.
There are separate accounts that store the data outside of the program. To execute the logic in a program, you would pass the account you want to perform on. In the case of this counter program, you pass a counter account to the program when calling the increment function, and the program will increment the value in the counter account.
What are the benefits of the Solana Account Model?
One of the most significant benefits of the Solana Account Model is program reusability.
Take ERC20 for example. ERC20 defines an interface specification on Ethereum for tokens. Every time someone wants to make a new token, the developer will have to redeploy the ERC20 smart contract onto Ethereum with its specified values, incurring the high cost of the redeployment.
Solana is different. You do not have to redeploy another smart contract onto the blockchain when creating new tokens. Instead, you create a new account, known as the mint account, off of the Solana Token Program, where the account defines a set of values to give the number of tokens in circulation, decimal points, who can mint more tokens, and who can freeze tokens.
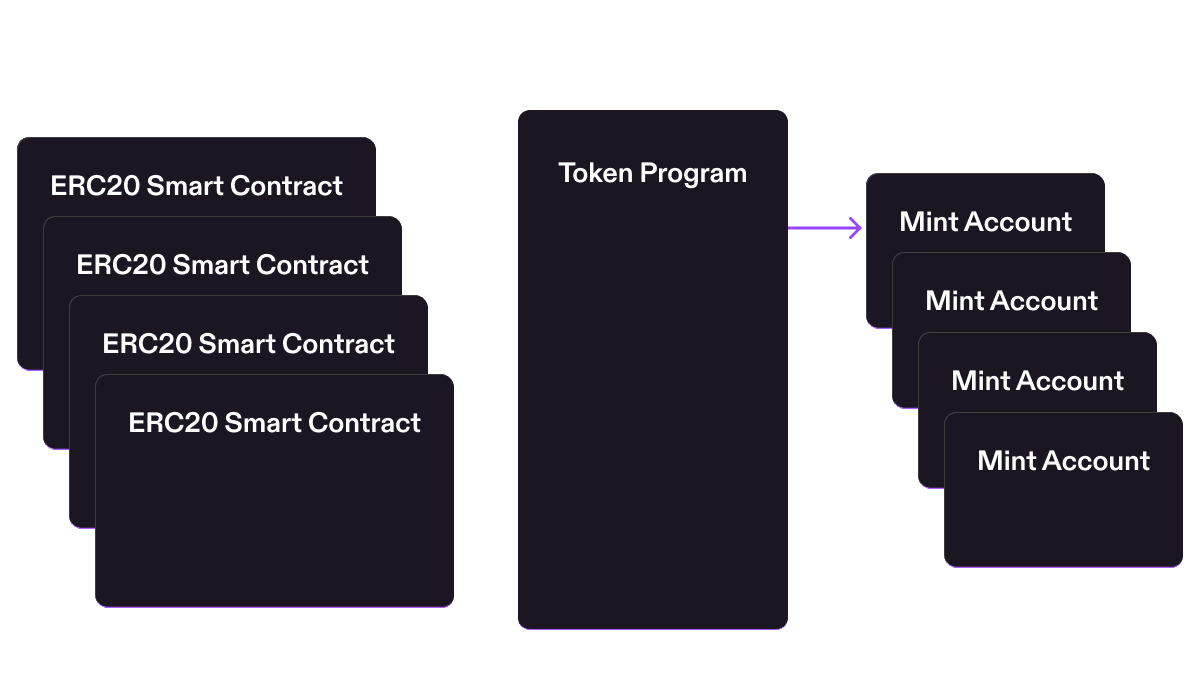
You do not need to write any Rust or smart contracts to deploy a new token on Solana. Send a transaction to the Token Program to create a new token in your language of choice, and the token will then appear in your wallet. With the Solana Program Library CLI, you can do this in a single command:
$ spl-token create-tokenLocal Fee Markets
Another fortunate side effect of having the Solana account model is the ability to model fees based on state contention. As mentioned earlier, transactions can be executed in parallel. However, they are only executed in parallel based on what accounts are being written to. For example, let's say there is a popular NFT mint going on Solana. Typically, this popularity would increase the prices for everyone using the chain, but instead, everyone not participating in the NFT mint is unaffected.
As the name suggests, fee markets are local per account. If you're sending a transfer of USDC to someone while everyone else is minting the hottest new NFT, you will be unaffected and continue paying the low fee you're used to on Solana. This works with any application in Solana, avoiding the common global fee market you're used to on Ethereum while lowering everyone's cost.
Solanaにおける手数料の仕組みは?
Solanaの手数料はいくつかのカテゴリに分けられます:ベース手数料、優先手数料、そしてrentです。
ベース手数料はトランザクション内の署名数に基づいて計算されます。各署名のコストは5000 lamport(0.000000001 SOL = 1 lamport)です。トランザクションに5つの署名が必要な場合、ベース手数料は25000 lamportになります。このベース手数料は、より計算負荷の高い処理のひとつであるクラスターの署名検証に対する経済的な負荷分散として機能します。ベース手数料の半分はバーンされ、残りの半分はvalidatorへの報酬となります。
優先手数料は任意の手数料で、同時に実行される他のトランザクションより優先順位を高めるためにトランザクションに追加できます。優先手数料はトランザクションで使用されるコンピュートユニット数に基づいて計算されます。コンピュートユニットはEthereumのGasに相当し、トランザクションに必要なコンピューティングリソースのシンプルな指標です。Ethereumと同様に、トランザクションの優先度はコンピュートユニット価格とコンピュートユニット使用量の積で計算されます(優先手数料 = コンピュートユニット × コンピュートユニット価格)。ベース手数料と同様に、優先手数料の半分はバーンされ、残りの半分はvalidatorへの報酬となります。
最後の手数料であるrentは、手数料というよりもデポジットに近いものです。ネットワーク上にアカウントを作成したり領域を割り当てたりする際には、ネットワークがアカウントを維持するために一定量のSOLをデポジットする必要があります。rentはネットワーク上に保存されるバイト数に基づいて計算され、領域の割り当てには追加のベース手数料が発生します。重要な点として、rent手数料は消滅するものではありません。アカウントを閉鎖し、割り当てられた領域をクラスターに返還することで回収できます。
Solanaでのトランザクションの仕組みは?
トランザクションを実行するたびに手数料が発生するため、トランザクションの仕組みを理解しておくことが重要です。トランザクションは3つの部分で構成されています:
- 1つ以上のinstructions
- 読み取りまたは書き込みを行うアカウントの配列
- 1つ以上の署名
- 最近のブロックハッシュまたはnonce
instructionは、Solana上での最小の実行ロジックです。instructionsはSolanaのグローバルステートを更新するための呼び出しです。instructionsはプログラムを呼び出し、そのプログラムがSolanaランタイムにステートの更新を要求します(たとえば、Token Programを呼び出して自分のアカウントから別のアカウントへトークンを転送するなど)。instructionは、Ethereumスマートコントラクト上の関数呼び出しのようなものと考えることができます。
EthereumとSolanaの大きな違いの一つは、1つのトランザクション内でのinstructionsの数です。1つのトランザクションに複数のinstructionsを含められることは、開発者にとって大きな利点です。単一のトランザクション内で関数をチェーンするためにカスタムスマートコントラクトを作成する必要がないからです。各instructionはトランザクション内で順番に実行される独立した関数呼び出しにできます。トランザクションはアトミックであり、いずれかのinstructionが失敗すると、トランザクション全体が失敗し、支払われるのはトランザクション手数料のみとなります。これはEthereumで正しいスリッページを設定しなかったことによるトランザクション失敗に似ています。
もう一つの重要な違いとして、トランザクションにインクリメンタルなnonceではなく最近のブロックハッシュを使用する点が挙げられます。ウォレットがトランザクションを作成する際、有効なトランザクションを生成するためにクラスターから最近のブロックハッシュが取得されます。この最近のブロックハッシュは、取得されてから150ブロック以内のみトランザクションを有効にします。これにより、後の時点でトランザクション署名が実行されることを防ぎます。
Cross-Program Invocation(CPI)
Cross Program Invocation(CPI)とは、あるSolanaプログラムが元のトランザクションの実行中に別のプログラムのinstructionを呼び出すことです。CPIはSolanaプログラム同士が連携する主な手段ですが、アカウントモデルによってコールグラフの設計方法が変わります。トランザクションは、CPIチェーン全体が読み書きするすべてのアカウントを、実行開始前に含めておく必要があります。
呼び出し先(callee)は、呼び出し元(caller)が受け取った署名権限と書き込み権限のみを継承し、同じトランザクションのコンピュートバジェットを共有します。必要な署名者全員が元のトランザクションに署名している場合はinvokeを使用します。呼び出しプログラムがいずれかのPDAに対してsigner seedsで署名する必要がある場合はinvoke_signedを使用します。
コミットメントレベル
RPCの読み取り、サブスクリプション、およびトランザクション確認ロジックでは、commitmentレベルを選択できます。これはEthereumのブロック確認数の待機設定に相当するSolanaの仕組みですが、階層が明示的に定義されている点が異なります:
processed:ノードが処理した最新のビューです。ロールバックを許容できるオプティミスティックUIやフローにのみ使用してください。confirmed:ステーク過半数によって投票されたブロックです。多くの本番確認やユーザー向けトランザクションステータスのデフォルトとして使用してください。finalized:最も強固な確認状態です。法定通貨の支払い、商品の発送、最終決済記録など、取り消し不可能なオフチェーンアクションの前に使用してください。
RPCメソッドがcommitmentを受け付ける場合に省略すると、通常のデフォルトはfinalizedです。本番クライアントでは、UIレイテンシー、インデクサーの動作、決済ポリシーを意図的に制御するために、commitmentを明示的に設定することを推奨します。
What are the limitations of transactions on Solana?
Like Ethereum gas limitations, there are specific compute unit limitations on transactions for Solana. Each limitation can be found below:
| Ethereum | Solana | |
| Single Transaction Compute Cap | 30,000,000 | 1,400,000 Compute Units |
| Block Compute Cap | 30,000,000 Gas | 48,000,000 Compute Units |
Solanaにはトランザクションに対していくつかの追加上限が設けられています。参照される各アカウントは、1ブロックあたり最大12,000,000コンピュートユニットしか使用できません。この上限により、1つのブロック内で単一のアカウントへの書き込みロックが過剰に行われることを防ぎ、ローカル手数料市場が1つのアカウントに独占されることを防ぎます。
CPIコールチェーンも意図的に浅く制限されています。SolanaではCPIのコール深度を4に制限しており、instructionスタックには元のinstructionとネストされたCPIフレームが含まれます。プログラムがその深度を超えると、ランタイムはCallDepthエラーを返してトランザクションが失敗します。深いコールグラフはフラット化するか、トランザクションを分割してください。
リエントランシー
Solanaでは、一般的なA -> B -> A攻撃に対してEVMスタイルのnonReentrantガードは必要ありません。ランタイムはReentrancyNotAllowedによって間接的なリエントランシーをブロックしますが、A -> A -> Aのような直接の自己再帰はスタック深度とコンピュート制限の範囲内で許可されます。実際のセキュリティ上の重点は「リエントランシーを無視する」ことではなく、「攻撃者がプログラムに渡すアカウントリストとinstruction dataを制御できるため、アカウントとCPIターゲットを慎重に検証する」ことです。
Where is the Mempool?
Unlike Ethereum, Mempools don’t exist on Solana. Solana validators forward transactions to up to the following four leaders on the leader schedule. While Solana doesn’t have a mempool, it still has priority fees to help order transactions. Not having a mempool forces the transactions to hop from leader to leader until blockhash expiration, but it reduces the overhead of gossip communicating the mempool across the cluster.
Where can I find smart contract code?
In the EVM world, most are familiar with finding smart contract code on Etherscan when viewing the smart contract address. However, viewing smart contract code on an explorer in the Solana ecosystem is relatively new and needs to be established compared to EVM standards. At the time of writing, Solana.fm is the only explorer that supports viewing smart contract code based on verifiable builds.
You can find the smart contract code by visiting a smart contract address the explorer. For example, going to the Phoenix smart contract, you can find the smart contract’s code under the verification tab. From here, you can analyze the code and understand if the smart contract is something you want to interact with.
What are the differences in the developer environment?
Programming languages
EVM primarily uses Solidity to write smart contracts, while Solana uses Rust. There is a framework called the Anchor framework that allows you to build in Rust with many of the tools you are familiar with from EVM, but it is still Rust. If you want to stick with Solidity while building on Solana, a project named Neon enables using Solidity. Neon comes with many of the tools you are familiar with, such as using Foundry or Hardhat during development. Using Neon may get you up and running faster, building on Solana, but you would need more composability outside of the Neon ecosystem with other Solana projects.
Like Ethereum, on the client side, you can find comparable SDKs for all your favorite programming languages on Solana.
| Language | SDK |
| Javascript | solana/web3.js |
| Rust | solana_sdk |
| Python | solana-py |
| Java | solanaj |
| C++ | solcpp |
| C# | Solnet |
| GoLang | solana-go |
Where are the tools I’m familiar with from EVM?
As you migrate from EVM to building on Solana, you may be looking for the tools you are familiar with. Currently, the Solana ecosystem does not have tooling equal to Foundry but has a decent amount of other equivalents to the tools you are used to.
| Tool | Solana Equivalent |
| HardHat | Solana Test Validator |
| Brownie | Program-test, BankRun.js |
| Ethers, Wagmi | @solana/web.js |
| Remix | Solana Playground |
| ABI | Anchor Framework's IDL |
| Etherscan | SolanaFM, XRay |
| scaffold-eth | create-solana-dapp |
スマートコントラクト開発の違いは何か?
SolanaでプログラムをビルドしたりEthereumスマートコントラクトを移行したりする際に注意すべき点がいくつかあります。
EVM開発者向けセキュリティチェックリスト
Solanaのセキュリティレビューは、EVMのリエントランシーガードから明示的なアカウントおよびCPI検証へとシフトします。移行したプログラムをデプロイする前に、以下を確認してください:
- 各アカウントのオーナー、アドレスまたはPDAシード、ディスクリミネーター、データ長、およびinstructionに含まれる他のアカウントとの関係を検証する。
- 各権限者を明示的な署名者または検証済みPDAとして要求する。暗黙の
msg.senderは存在しない。 - instructionが独立した残高、ボールト、またはコンフィグアカウントを期待する場合、重複するミュータブルアカウントを拒否する。
- CPIターゲットを期待されるプログラムIDに固定し、攻撃者が提供するアカウントがCPIアカウントリストに差し替えられないようにする。
init_if_neededなどのヘルパーを使用する場合は特に、既存アカウントの再初期化から初期化パスを保護する。- lamportを引き出してステートをクローズ済みとしてマークすることでアカウントをクローズし、同じトランザクション内で後から復元されないようにする。
- チェック付き演算を使用し、トークンのデシマル、ミントアドレス、トークンプログラムのバリアントが元のSolidityの前提と一致することを確認する。
- アカウントの差し替え、署名者のなりすまし、任意のCPIプログラムID、重複する書き込み可能アカウント、再初期化、アカウントのクローズ、CPI後の古い読み取りをテストする。
たとえば、Ethereumスマートコントラクトで使い慣れたマッピングに相当するものをお探しの場合、この型はSolanaには直接存在しません。代わりに、Program Derived Addressを使用します(略称:PDA)。マッピングと同様に、Program Derived Addressはキーまたはアカウントからオンチェーンに保存された値へのマップを作成する機能を提供します。ただし、マッピングの方法はEthereumとは異なります。
ユーザーアカウントとその残高をオンチェーンでマッピングしたいとします。Solidityでは次のように記述します:
mapping(address => uint) public balances;With program derived addresses, you instead have to do the following:
Client:
const [BALANCE_PDA] = await anchor.web3.PublicKey.findProgramAddress(
  [Buffer.from("BALANCE"), pg.wallet.publicKey.toBuffer()],
  pg.program.programId
);
Program:
#[derive(Accounts)]
#[instruction(restaurant: String)]
pub struct BalanceAccounts<'info> {
    #[account(
        init_if_needed,
        payer = signer,
        space = 500,
        seeds = [balance.as_bytes().as_ref(), signer.key().as_ref()],
        bump
    )]
    pub balance: Account<'info, BalanceAccount>,
    #[account(mut)]
    pub signer: Signer<'info>,
    pub system_program: Program<'info, System>,
}

#[account]
pub struct BalanceAccount {
    pub balance: u8
}
The map's key is derived from the combination of the "balance" string and the signer's public key, while the program derived address provides the location to look up the map's value. Program derived addresses have more functionality than just providing a map; we can learn about that later.
In Solidity, the ability to upgrade your smart contracts using proxy contracts has become the norm. On Solana, programs are default upgradable without any special work involved. Each smart contract can be upgraded by a CLI command solana program deploy <program_filepath. While programs are default upgradable, you can still demote their status to immutable with solana program set-upgrade-authority <program_address> --final. Once immutable, the program will be flagged as not upgradable on the explorers.
A common thing you do when writing a solidity smart contract is check for either msg.sender or tx.origin. There isn't an equivalent on Solana because each transaction can have multiple signers. Also the person sending the transaction is not necessarily the one who signed the transaction because you have someone else pay for your transactions.
Let’s take a look at this basic Solana Program:
#[program]
pub mod gettingSigners {
    use super::*;

    pub fn initialize(ctx: Context<Initialize>) -> Result<()> {
        let the_signer: &mut Signer = &mut ctx.accounts.the_signer;

        msg!("The signer: {:?}", *the_signer.key);

        Ok(())
    }
}

#[derive(Accounts)]
pub struct Initialize<'info> {
    #[account(mut)]
    pub the_signer: Signer<'info>,
}
This will output a signer of the transaction as part of your program logs. As mentioned before, you can have multiple signers:
#[program]
pub mod gettingSigners {
    use super::*;

    pub fn initialize(ctx: Context<Initialize>) -> Result<()> {
        let the_signer: &mut Signer = &mut ctx.accounts.first_signer;

        msg!("The signer: {:?}", *the_signer.key);

        Ok(())
    }
}

#[derive(Accounts)]
pub struct Initialize<'info> {
    #[account(mut)]
    pub first_signer: Signer<'info>,
    pub second_signer: Signer<'info>,
}
The above example shows that this specific program has multiple signers, first_signer and second_signer. We cannot necessarily tell which one is the payer, but we know both have signed the transaction. You can learn more about getting signers on Rareskills.
How do I build my EVM project on Solana?
Let’s take a simple project built in Solidity and go through the process of building the same project on Solana. A common first project you run into is a voting project. The Solidity smart contract would look like this:
pragma solidity ^0.6.4;

contract Voting {

    mapping (bytes32 => uint256) public votesReceived;

    bytes32[] public candidateList;

    constructor(bytes32[] memory candidateNames) public {
        candidateList = candidateNames;
    }

    function voteForCandidate(bytes32 candidate) public {
        require(validCandidate(candidate));
        votesReceived[candidate] += 1;
    }

    function totalVotesFor(bytes32 candidate) view public returns (uint256) {
        require(validCandidate(candidate));
        return votesReceived[candidate];
    }

    function validCandidate(bytes32 candidate) view public returns (bool) {
        for(uint i = 0; i < candidateList.length; i++) {
            if (candidateList[i] == candidate) {
                return true;
            }
        }
        return false;
    }
}
We quickly noticed a few things that were not available in Solana programs. View functions and mapping need to be done differently. Let’s start building this program on Solana!
Let’s create our very basic Solana program shell:
use anchor_lang::prelude::*;

declare_id!("6voY4gV7kzuGr4hE2xjZnkdagFGNhEe8WonZ8UtdPWig");

#[program]
pub mod voting {
    use super::*;

    pub fn init_candidate(ctx: Context<InitializeCandidate>) -> Result<()> {
        Ok(())
    }

    pub fn vote_for_candidate(ctx: Context<VoteCandidate>) -> Result<()> {
        Ok(())
    }
}

#[derive(Accounts)]
pub struct InitializeCandidate {}

#[derive(Accounts)]
pub struct VoteCandidate {}
We have two functions in our voting program, init_candidate and vote_for_candidate. The init_candidate function maps directly to our constructor in the Solidity smart contract, while vote_for_candidate maps one-to-one with voteForCandidate in Solidity.
One problem with init_candidate today is that it can be called by anyone permissionless, unlike the constructor in Solidity only being called by the contract deployer. To solve this, we will employ a similar feature to onlyOwner from Solidity. We set a specific address on the Solana program that is the only one that can execute the instruction.
Let’s say our publicKey is 8os8PKYmeVjU1mmwHZZNTEv5hpBXi5VvEKGzykduZAik. By adding a reference to this publicKey in the Solana program and requiring the signer to match, we effectively emulate both onlyOwner and the constructor.
use anchor_lang::prelude::*;

declare_id!("6voY4gV7kzuGr4hE2xjZnkdagFGNhEe8WonZ8UtdPWig");

const OWNER: &str = "8os8PKYmeVjU1mmwHZZNTEv5hpBXi5VvEKGzykduZAik";

#[program]
pub mod voting {
    use super::*;

    #[access_control(check(&ctx))]
    pub fn init_candidate(ctx: Context<InitializeCandidate>) -> Result<()> {
        Ok(())
    }

    pub fn vote_for_candidate(ctx: Context<VoteCandidate>) -> Result<()> {
        Ok(())
    }
}

#[derive(Accounts)]
pub struct InitializeCandidate<'info> {
    #[account(mut)]
    pub payer: Signer<'info>,
}

#[derive(Accounts)]
pub struct VoteCandidate {}

fn check(ctx: &Context<InitializeCandidate>) -> Result<()> {
    // Check if signer === owner
    require_keys_eq!(
        ctx.accounts.payer.key(),
        OWNER.parse::<Pubkey>().unwrap(),
        OnlyOwnerError::NotOwner
    );
    Ok(())
}

#[error_code]
pub enum OnlyOwnerError {
    #[msg("Only owner can call this function!")]
    NotOwner,
}
We added an access control function check that will check if the signer of init_candidate matches the address listed in the smart contract. If the signer does not match, the OnlyOwnerError will be thrown, and the transaction will fail.
Let’s move on to the next bit in the Solidity smart contract, candidateList and votesReceived. While you can use a Vec in a Solana program similar to bytes32[], managing the payments for changing the size can be a bit of a hassle. Instead, we will utilize Program Derived Addresses given specific candidate name, with the value found at that address being the votesReceived by the candidate.
To use Program Derived Accounts in a Solana Program, you use seeds and bump in the account. First, let’s create the account to track votesReceived.
#[account]
#[derive(InitSpace)]
pub struct Candidate {
    pub votes_received: u8,
}
#[account] denotes the struct as a Solana account, while the #[derive(InitSpace)] is a useful macro for auto-calculating the space required to allocate for Candidate. The votes_received can hold a count just like votesReceived in the Solidity smart contract.
Expanding the InitializeCandidate and VoteCandidate, we get the following:
#[derive(Accounts)]
#[instruction(_candidate_Name: String)]
pub struct InitializeCandidate<'info> {
    #[account(mut)]
    pub payer: Signer<'info>,

    #[account(
        init,
        space = 8 + Candidate::INIT_SPACE,
        payer = payer,
        seeds = [_candidate_Name.as_bytes().as_ref()],
        bump,
    )]
    pub candidate: Account<'info, Candidate>,
    pub system_program: Program<'info, System>,
}

#[derive(Accounts)]
#[instruction(_candidate_Name: String)]
pub struct VoteCandidate<'info> {
    #[account(
        mut,
        seeds = [_candidate_Name.as_bytes().as_ref()],
        bump,
    )]
    pub candidate: Account<'info, Candidate>,
}
Wow, that’s a lot of new code in the accounts. Let’s unpack it.
First you’ll notice #[instruction(_candidate_Name: String)]. This means the context for InitializeCandidate expects a string _candidate_name to be passed into the instruction. We can see later this is used in seeds = [_candidate_name.as_bytes().as_ref()]. This means that the seed of the PDA will be _candidate_Name, and the value stored at the PDA will be the candidate’s votes_received.
Next you may have some questions on space = 8 + Candidate::INIT_SPACE. The Candidate::INIT_SPACE is how big the Candidate account is + 8, 8 being the bytes added at the beginning of Anchor framework accounts for security checks. pub system_program: Program<'info, System>, is required when you’re creating an account, which is denoted by init. This means that any time an instruction using the InitializeCandidate context is called, the instruction will try to create a candidate account.
Now let’s add the business logic found in voteForCandidate from the Solidity smart contract.
pub fn vote_for_candidate(ctx: Context<VoteCandidate>, _candidate_name: String) -> Result<()> {
    ctx.accounts.candidate.votes_received += 1;
    Ok(())
}
Here we take an additional parameter discussed earlier, _candidate_name . This will help match to the exact account we’re referencing for the candidate. We then increment the votes by 1 for that candidate.
That’s all we need to complete on the Solana program side, with the final Solana program looking like this:
use anchor_lang::prelude::*;

declare_id!("6voY4gV7kzuGr4hE2xjZnkdagFGNhEe8WonZ8UtdPWig");

const OWNER: &str = "8os8PKYmeVjU1mmwHZZNTEv5hpBXi5VvEKGzykduZAik";

#[program]
pub mod voting {
    use super::*;

    #[access_control(check(&ctx))]
    pub fn init_candidate(ctx: Context<InitializeCandidate>, _candidate_name: String) -> Result<()> {
        Ok(())
    }

    pub fn vote_for_candidate(ctx: Context<VoteCandidate>, _candidate_name: String) -> Result<()> {
        ctx.accounts.candidate.votes_received += 1;
        Ok(())
    }
}

#[derive(Accounts)]
#[instruction(_candidate_name: String)]
pub struct InitializeCandidate<'info> {
    #[account(mut)]
    pub payer: Signer<'info>,

    #[account(
        init,
        space = 8 + Candidate::INIT_SPACE,
        payer = payer,
        seeds = [_candidate_name.as_bytes().as_ref()],
        bump,
    )]
    pub candidate: Account<'info, Candidate>,
    pub system_program: Program<'info, System>,
}

#[derive(Accounts)]
#[instruction(_candidate_name: String)]
pub struct VoteCandidate<'info> {
    #[account(
        mut,
        seeds = [_candidate_name.as_bytes().as_ref()],
        bump,
    )]
    pub candidate: Account<'info, Candidate>,
}

#[account]
#[derive(InitSpace)]
pub struct Candidate {
    pub votes_received: u8,
}

fn check(ctx: &Context<InitializeCandidate>) -> Result<()> {
    // Check if signer === owner
    require_keys_eq!(
        ctx.accounts.payer.key(),
        OWNER.parse::<Pubkey>().unwrap(),
        OnlyOwnerError::NotOwner
    );
    Ok(())
}

#[error_code]
pub enum OnlyOwnerError {
    #[msg("Only owner can call this function!")]
    NotOwner,
}
Now you might think, “But wait, what about totalVotesFor and validCandidate from the Solidity smart contract?” validCandidate is already accounted for because vote_for_candidate will fail if you pass an account that does not exist. totalVotesFor can be done client-side with Typescript and does not need to exist within the Solana program.
Now that we’ve built the Solana program, let’s interact with it.
Loading the program into Solana Playground, I can build and deploy it to Devnet. Once you build and deploy the program, you’ll find that you can run tests with the instructions on the test tab.
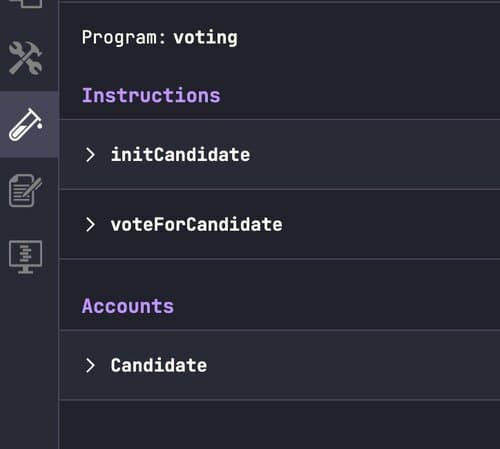
This is akin to using Remix to test your Solidity smart contract. Opening up initCandidate and entering the name John Smith as the candidate name, we now have to generate the PDA for John Smith. Click on the candidate account finder and select From seed. Select the custom String and input John Smith, and finally click generate. Congratulations, you just found your PDA for John Smith! Now hit Test to execute the instruction.
If all is successful, you should see the following program logs on the test transaction.
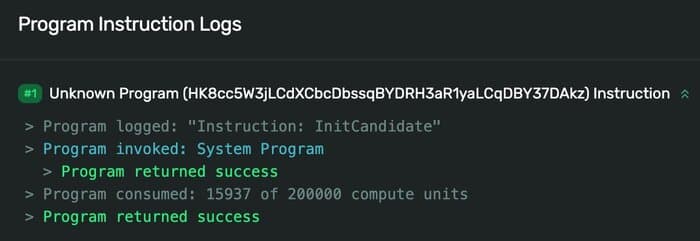
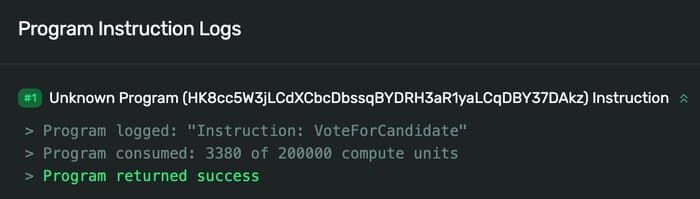
Now let’s vote for John Smith ! Opening up the
voteForCandidate instruction, type in John Smith and
generate the same PDA again. Hit Test to vote for your first
candidate!
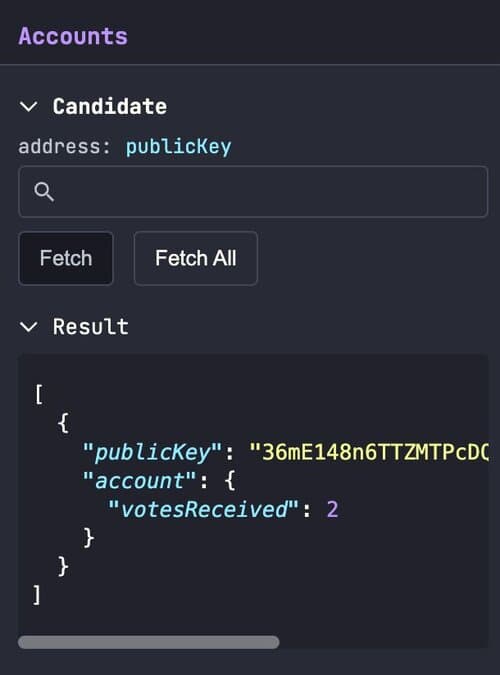
Now that you’ve voted, how can you check how many votes the candidate has?
Head on over to Candidate under Accounts on the test
tab and hit the button Fetch All. This will grab all valid
candidates and their votes. From there you’ll receive an array of the
candidates, their account addresses, and their votes.
Congratulations! You just took the voting Solidity smart contract and translated into a Solana program. You can use a lot of the same techniques on other Solidity smart contracts to build what you have on EVM on Solana. If you’re interested to learn more about Solana, check out the documentation and get started today.